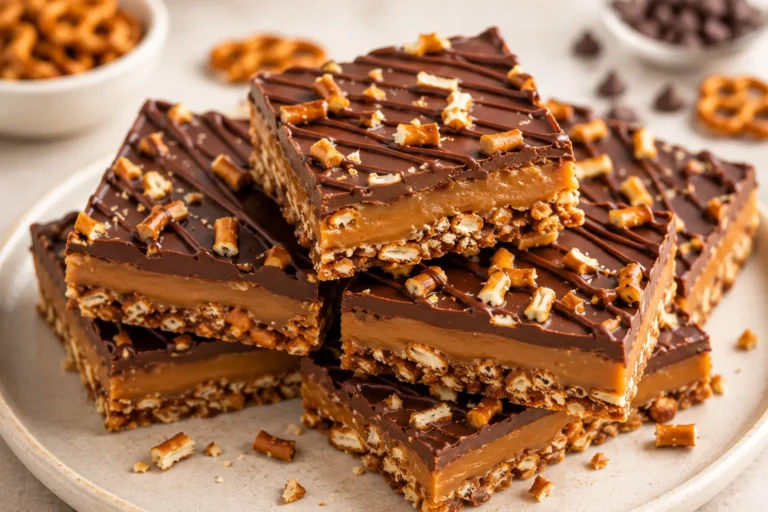
No-Bake Peanut Butter Bars – Simple, Satisfying, and Ready Fast
No oven, no stress, and big peanut butter flavor. These no-bake bars come together in minutes and feel like a treat you’d buy at a bakery. They set up in the fridge, slice cleanly, and deliver that perfect mix of salty, sweet, and chocolate.
Whether you need an after-school snack, an easy dessert for a potluck, or a make-ahead sweet for busy weeks, this recipe has you covered. You’ll love how easy they are to customize, too.

No-Bake Peanut Butter Bars – Simple, Satisfying, and Ready Fast
Ingredients
Method
- Prep the pan. Line a 9×13-inch baking pan with parchment, leaving overhang on two sides for easy lifting.Lightly butter or spray the parchment.
- Mix the base. In a large bowl, stir together melted butter, 2 cups peanut butter, graham cracker crumbs, powdered sugar, vanilla, and salt. The mixture should look thick, glossy, and a bit like cookie dough. If it seems dry, add 1–2 tablespoons more melted butter; if too soft, add a few more crumbs.
- Press and smooth. Transfer the peanut butter mixture to the pan.Press firmly into an even layer. Use the back of a measuring cup to smooth the top and compact the base so it holds together well.
- Melt the chocolate. In a microwave-safe bowl, combine chocolate chips and 2 tablespoons peanut butter. Microwave in 20–30 second bursts, stirring between each, until smooth and glossy.You can also melt in a heatproof bowl set over a pot of barely simmering water.
- Top the bars. Pour the warm chocolate mixture over the peanut butter layer. Tilt the pan to spread, or use an offset spatula to smooth to the edges. Tap the pan gently to remove any air bubbles.
- Chill to set. Refrigerate uncovered for 1–2 hours, or until the chocolate is firm to the touch.For a cleaner slice, wait the full 2 hours.
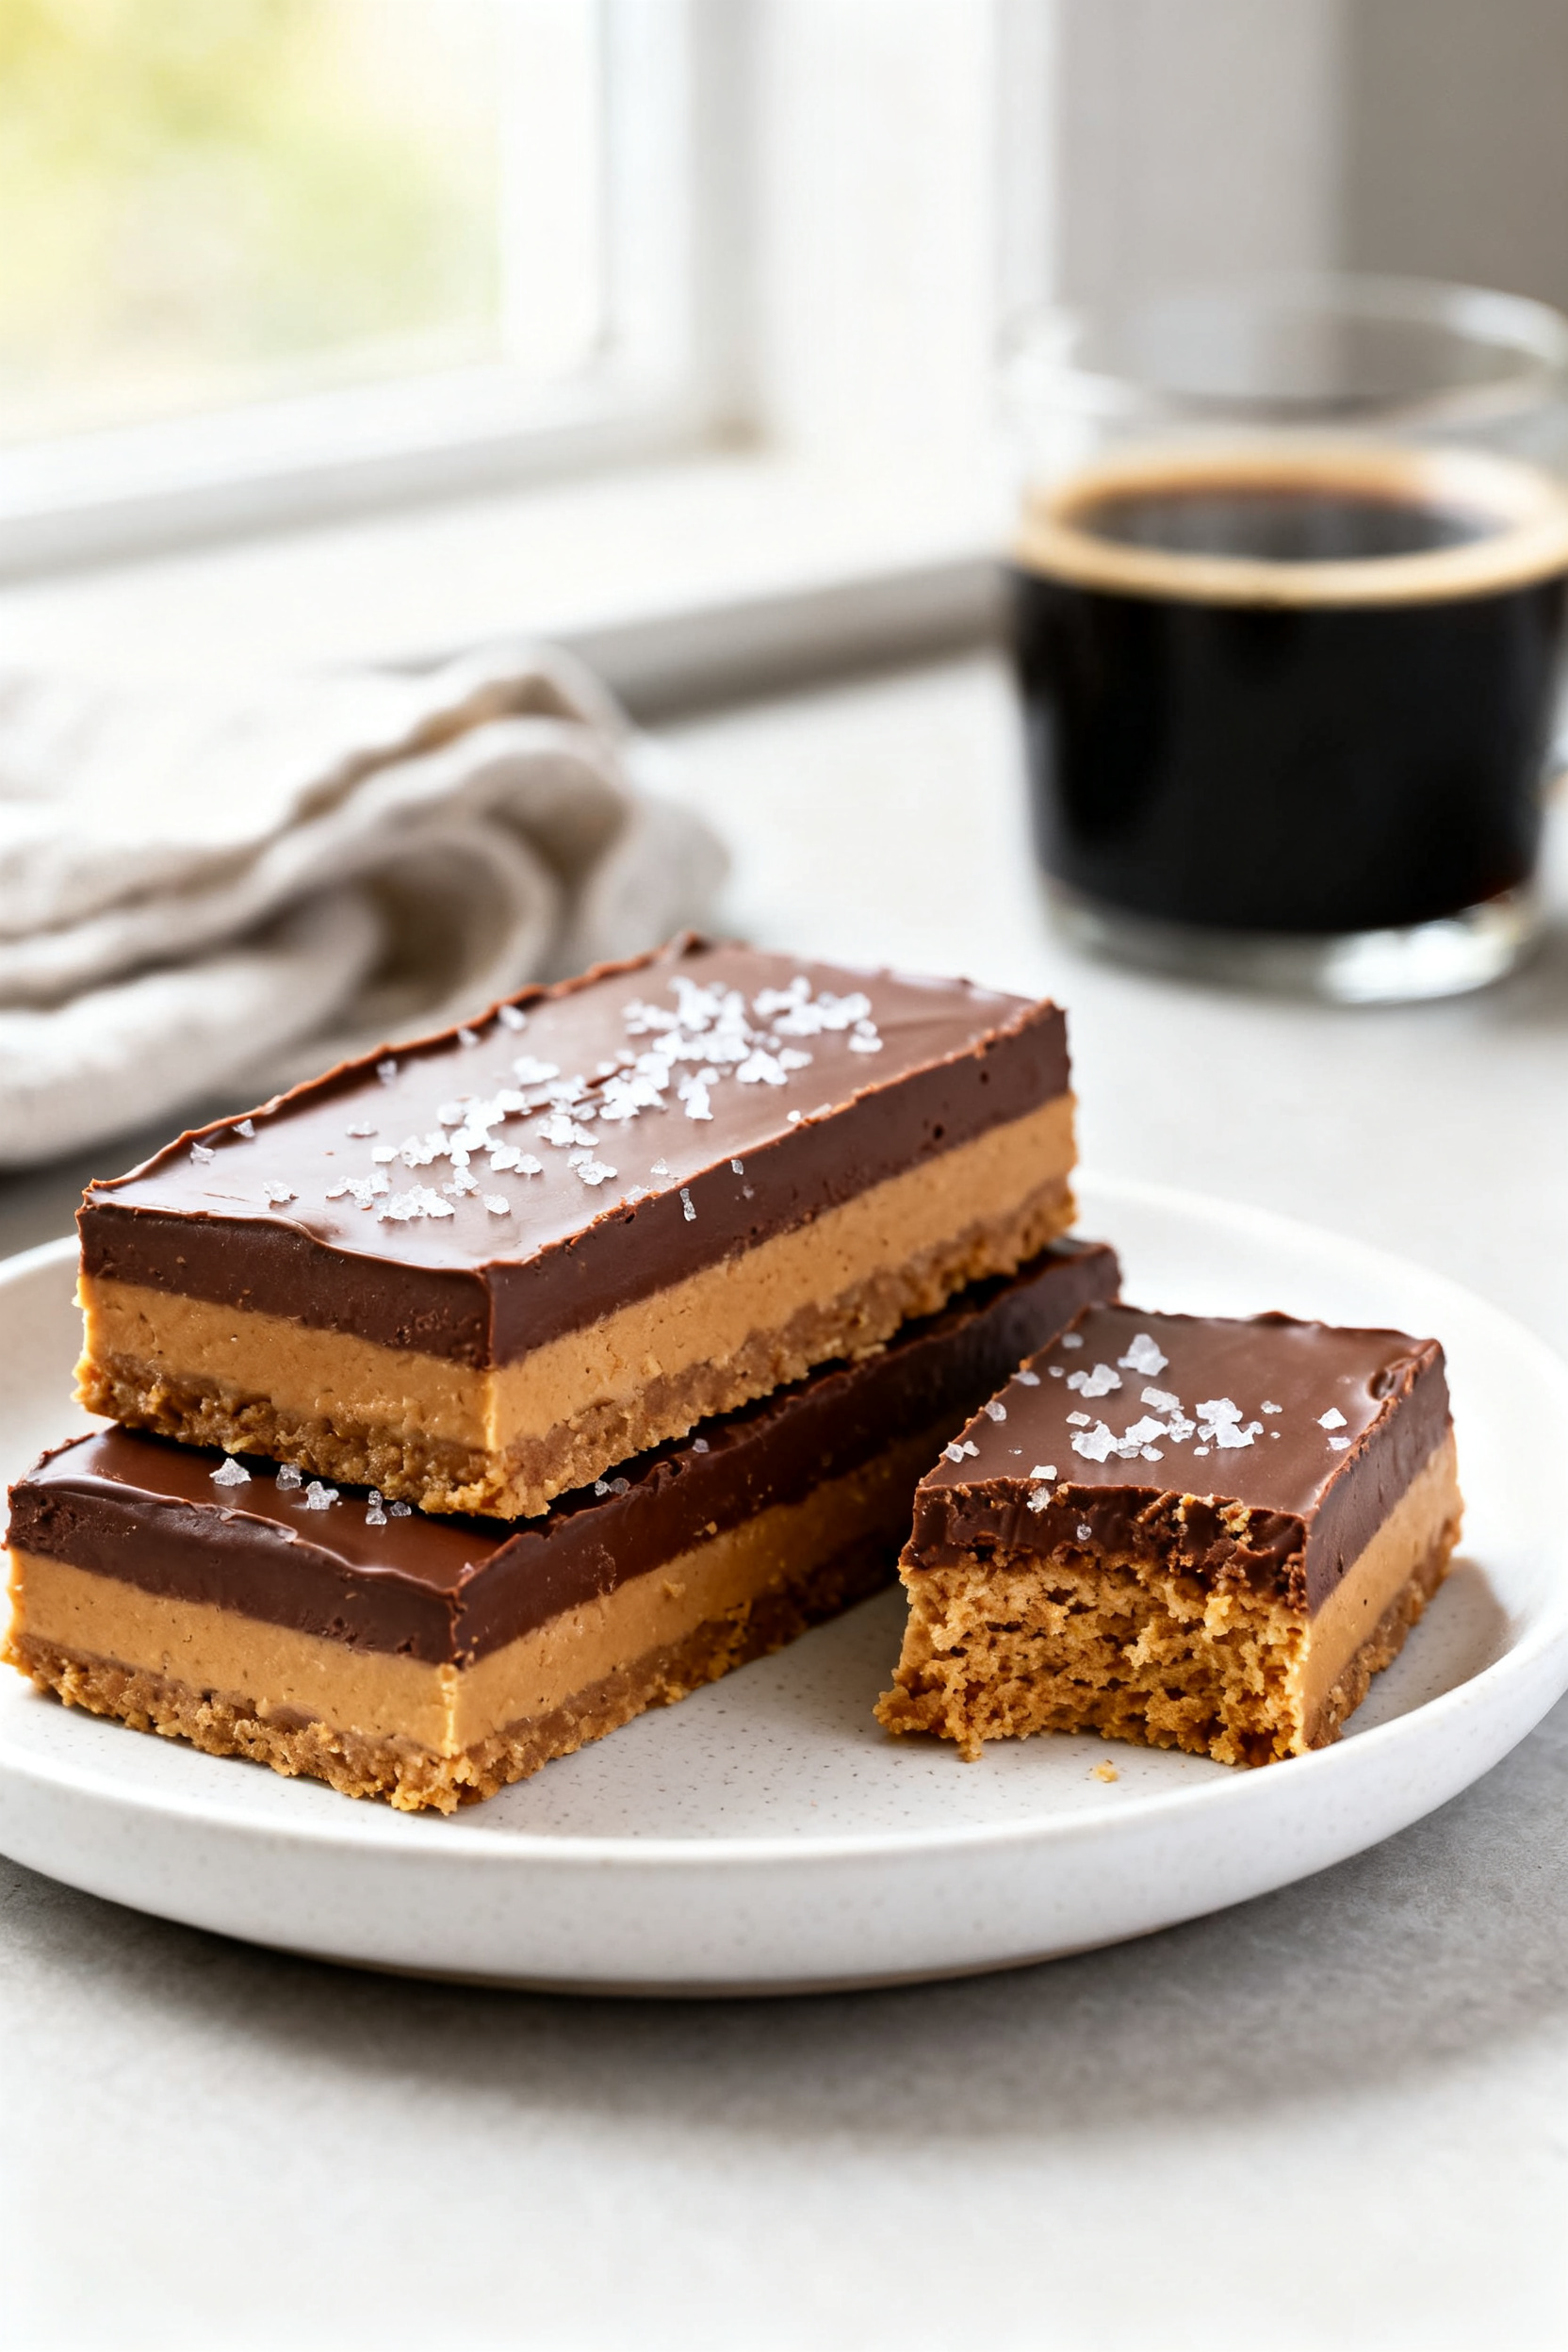
- Slice and serve. Lift the slab out using the parchment. Warm a knife under hot water, wipe it dry, and cut into bars or squares. Sprinkle flaky sea salt on top if you like a sweet-salty finish.
What Makes This Special

These bars are all about rich, creamy peanut butter balanced with a smooth chocolate top. The base has a soft, fudgy texture with a little crunch from graham cracker crumbs.
They taste like a peanut butter cup in bar form, but heartier and less fussy.
You don’t need any fancy tools, just a bowl and a pan. The recipe scales well, holds up in lunchboxes, and freezes beautifully. Best of all, it’s beginner friendly, but still feels a little impressive.
What You’ll Need (Ingredients)
- 1 cup (225 g) unsalted butter, melted
- 2 cups (500 g) creamy peanut butter (not natural drippy style for best texture)
- 2 cups (240 g) graham cracker crumbs (about 14–16 full sheets, finely crushed)
- 2 cups (240 g) powdered sugar, sifted if lumpy
- 1 teaspoon vanilla extract
- 1/4 teaspoon fine salt (skip if your peanut butter is very salty)
- 1 1/2 cups (270 g) semisweet chocolate chips or chopped chocolate
- 2 tablespoons (30 g) creamy peanut butter (for the chocolate topping)
- Flaky sea salt, optional, for finishing
Instructions

- Prep the pan. Line a 9×13-inch baking pan with parchment, leaving overhang on two sides for easy lifting.
Lightly butter or spray the parchment.
- Mix the base. In a large bowl, stir together melted butter, 2 cups peanut butter, graham cracker crumbs, powdered sugar, vanilla, and salt. The mixture should look thick, glossy, and a bit like cookie dough. If it seems dry, add 1–2 tablespoons more melted butter; if too soft, add a few more crumbs.
- Press and smooth. Transfer the peanut butter mixture to the pan.
Press firmly into an even layer. Use the back of a measuring cup to smooth the top and compact the base so it holds together well.
- Melt the chocolate. In a microwave-safe bowl, combine chocolate chips and 2 tablespoons peanut butter. Microwave in 20–30 second bursts, stirring between each, until smooth and glossy.
You can also melt in a heatproof bowl set over a pot of barely simmering water.
- Top the bars. Pour the warm chocolate mixture over the peanut butter layer. Tilt the pan to spread, or use an offset spatula to smooth to the edges. Tap the pan gently to remove any air bubbles.
- Chill to set. Refrigerate uncovered for 1–2 hours, or until the chocolate is firm to the touch.
For a cleaner slice, wait the full 2 hours.
- Slice and serve. Lift the slab out using the parchment. Warm a knife under hot water, wipe it dry, and cut into bars or squares. Sprinkle flaky sea salt on top if you like a sweet-salty finish.
How to Store
Refrigerator: Keep bars in an airtight container for up to 1 week.
Layer with parchment to prevent sticking.
Freezer: Freeze for up to 3 months. Wrap tightly and store in a freezer bag or container. Thaw in the fridge for best texture, or enjoy slightly chilled for a firmer bite.
Room temperature: They’ll hold for a few hours at cool room temp, but the chocolate may soften.
For parties, set them out shortly before serving.
Why This is Good for You
Protein and healthy fats: Peanut butter brings plant-based protein and fats that help keep you full longer. That can curb mindless snacking.
Energy-dense: These bars deliver steady energy, making them great for lunchboxes or a pre-workout bite. Pair with fruit for balance.
Customizable sugar: You control the sweetness.
You can reduce powdered sugar slightly or choose darker chocolate for a less-sweet finish.
Common Mistakes to Avoid
- Using natural “drippy” peanut butter without adjusting: Natural peanut butter can make the base oily or loose. If you use it, stir very well and add extra graham crumbs until the mixture holds its shape.
- Skipping the compression step: Not pressing the base firmly makes crumbly bars. Pack it down tightly for clean slices.
- Overheating the chocolate: Burnt or seized chocolate turns grainy.
Melt gently and stir often for a smooth top.
- Slicing too soon: If the chocolate isn’t set, it will smear. Chill fully, then use a warm, dry knife for best results.
- Too much salt: Taste your peanut butter first. If it’s already salty, reduce or skip the added salt.
Variations You Can Try
- Crunchy twist: Use crunchy peanut butter or stir in 1/2 cup chopped roasted peanuts for texture.
- Oat base: Swap half the graham crumbs for quick oats.
Pulse the oats briefly for a finer texture.
- Dark chocolate and espresso: Use 70% dark chocolate and add 1/2 teaspoon instant espresso to the topping for a bolder flavor.
- Peanut-free options: Almond butter or sunflower seed butter both work. Choose a thicker, stabilized version for the best set.
- Gluten-free: Use certified gluten-free graham crackers or crushed gluten-free cookies.
- Lower-sugar version: Reduce powdered sugar by 1/4–1/2 cup and use extra crumbs to balance texture. Pick unsweetened or very dark chocolate.
- Marble top: Reserve 2 tablespoons peanut butter.
Dollop on the melted chocolate and swirl with a toothpick for a bakery-style finish.
FAQ
Can I make these without graham crackers?
Yes. Swap with crushed digestive biscuits, vanilla wafers, or a mix of quick oats and finely ground pretzels. Adjust until the base is thick and scoopable, not wet.
What if my bars are too soft?
Chill longer first.
If they’re still soft, next time add more crumbs or a few tablespoons of powdered sugar. Using a stabilized peanut butter (not natural) also helps them set firmer.
How do I cut clean squares without cracking the chocolate?
Warm a sharp knife under hot water, dry it, and cut straight down with steady pressure. Wipe and rewarm the knife between cuts.
You can also let the bars sit at room temp for 5–10 minutes before slicing.
Can I halve the recipe?
Absolutely. Use an 8×8-inch pan, and keep an eye on the chill time, which may be slightly shorter. The ratios stay the same.
What chocolate works best?
Semisweet chips are easy and consistent.
If using bars of chocolate, chop them finely so they melt evenly. Dark chocolate gives a less-sweet finish, while milk chocolate makes a softer, sweeter top.
Are these safe for nut allergies?
Use sunflower seed butter and check all labels for cross-contamination warnings. Swap peanuts for seeds if adding mix-ins, and choose nut-free cookies for the base.
Can I add protein powder?
Yes.
Replace up to 1/2 cup of the powdered sugar with an unflavored or vanilla protein powder. You may need a splash of milk or a bit more melted butter to keep the base cohesive.
Do they need to stay refrigerated?
They’re best stored chilled to keep the layers firm. For serving, they can sit out for a couple of hours, but return leftovers to the fridge to maintain texture.
Can I make them dairy-free?
Swap the butter for a dairy-free butter or refined coconut oil and use dairy-free chocolate.
The texture will still be rich and sliceable.
How far in advance can I make these?
Make them up to 3 days ahead and keep them covered in the fridge. For longer storage, freeze and thaw overnight in the refrigerator before serving.
In Conclusion
These No-Bake Peanut Butter Bars are the kind of recipe you’ll keep on repeat—simple steps, pantry ingredients, and dependable results. They’re rich without being fussy and flexible enough to fit your taste or pantry swaps.
Make a pan today, slice them neat, and enjoy that peanut-butter-and-chocolate moment any time you need a little treat.
Printable Recipe Card
Want just the essential recipe details without scrolling through the article? Get our printable recipe card with just the ingredients and instructions.