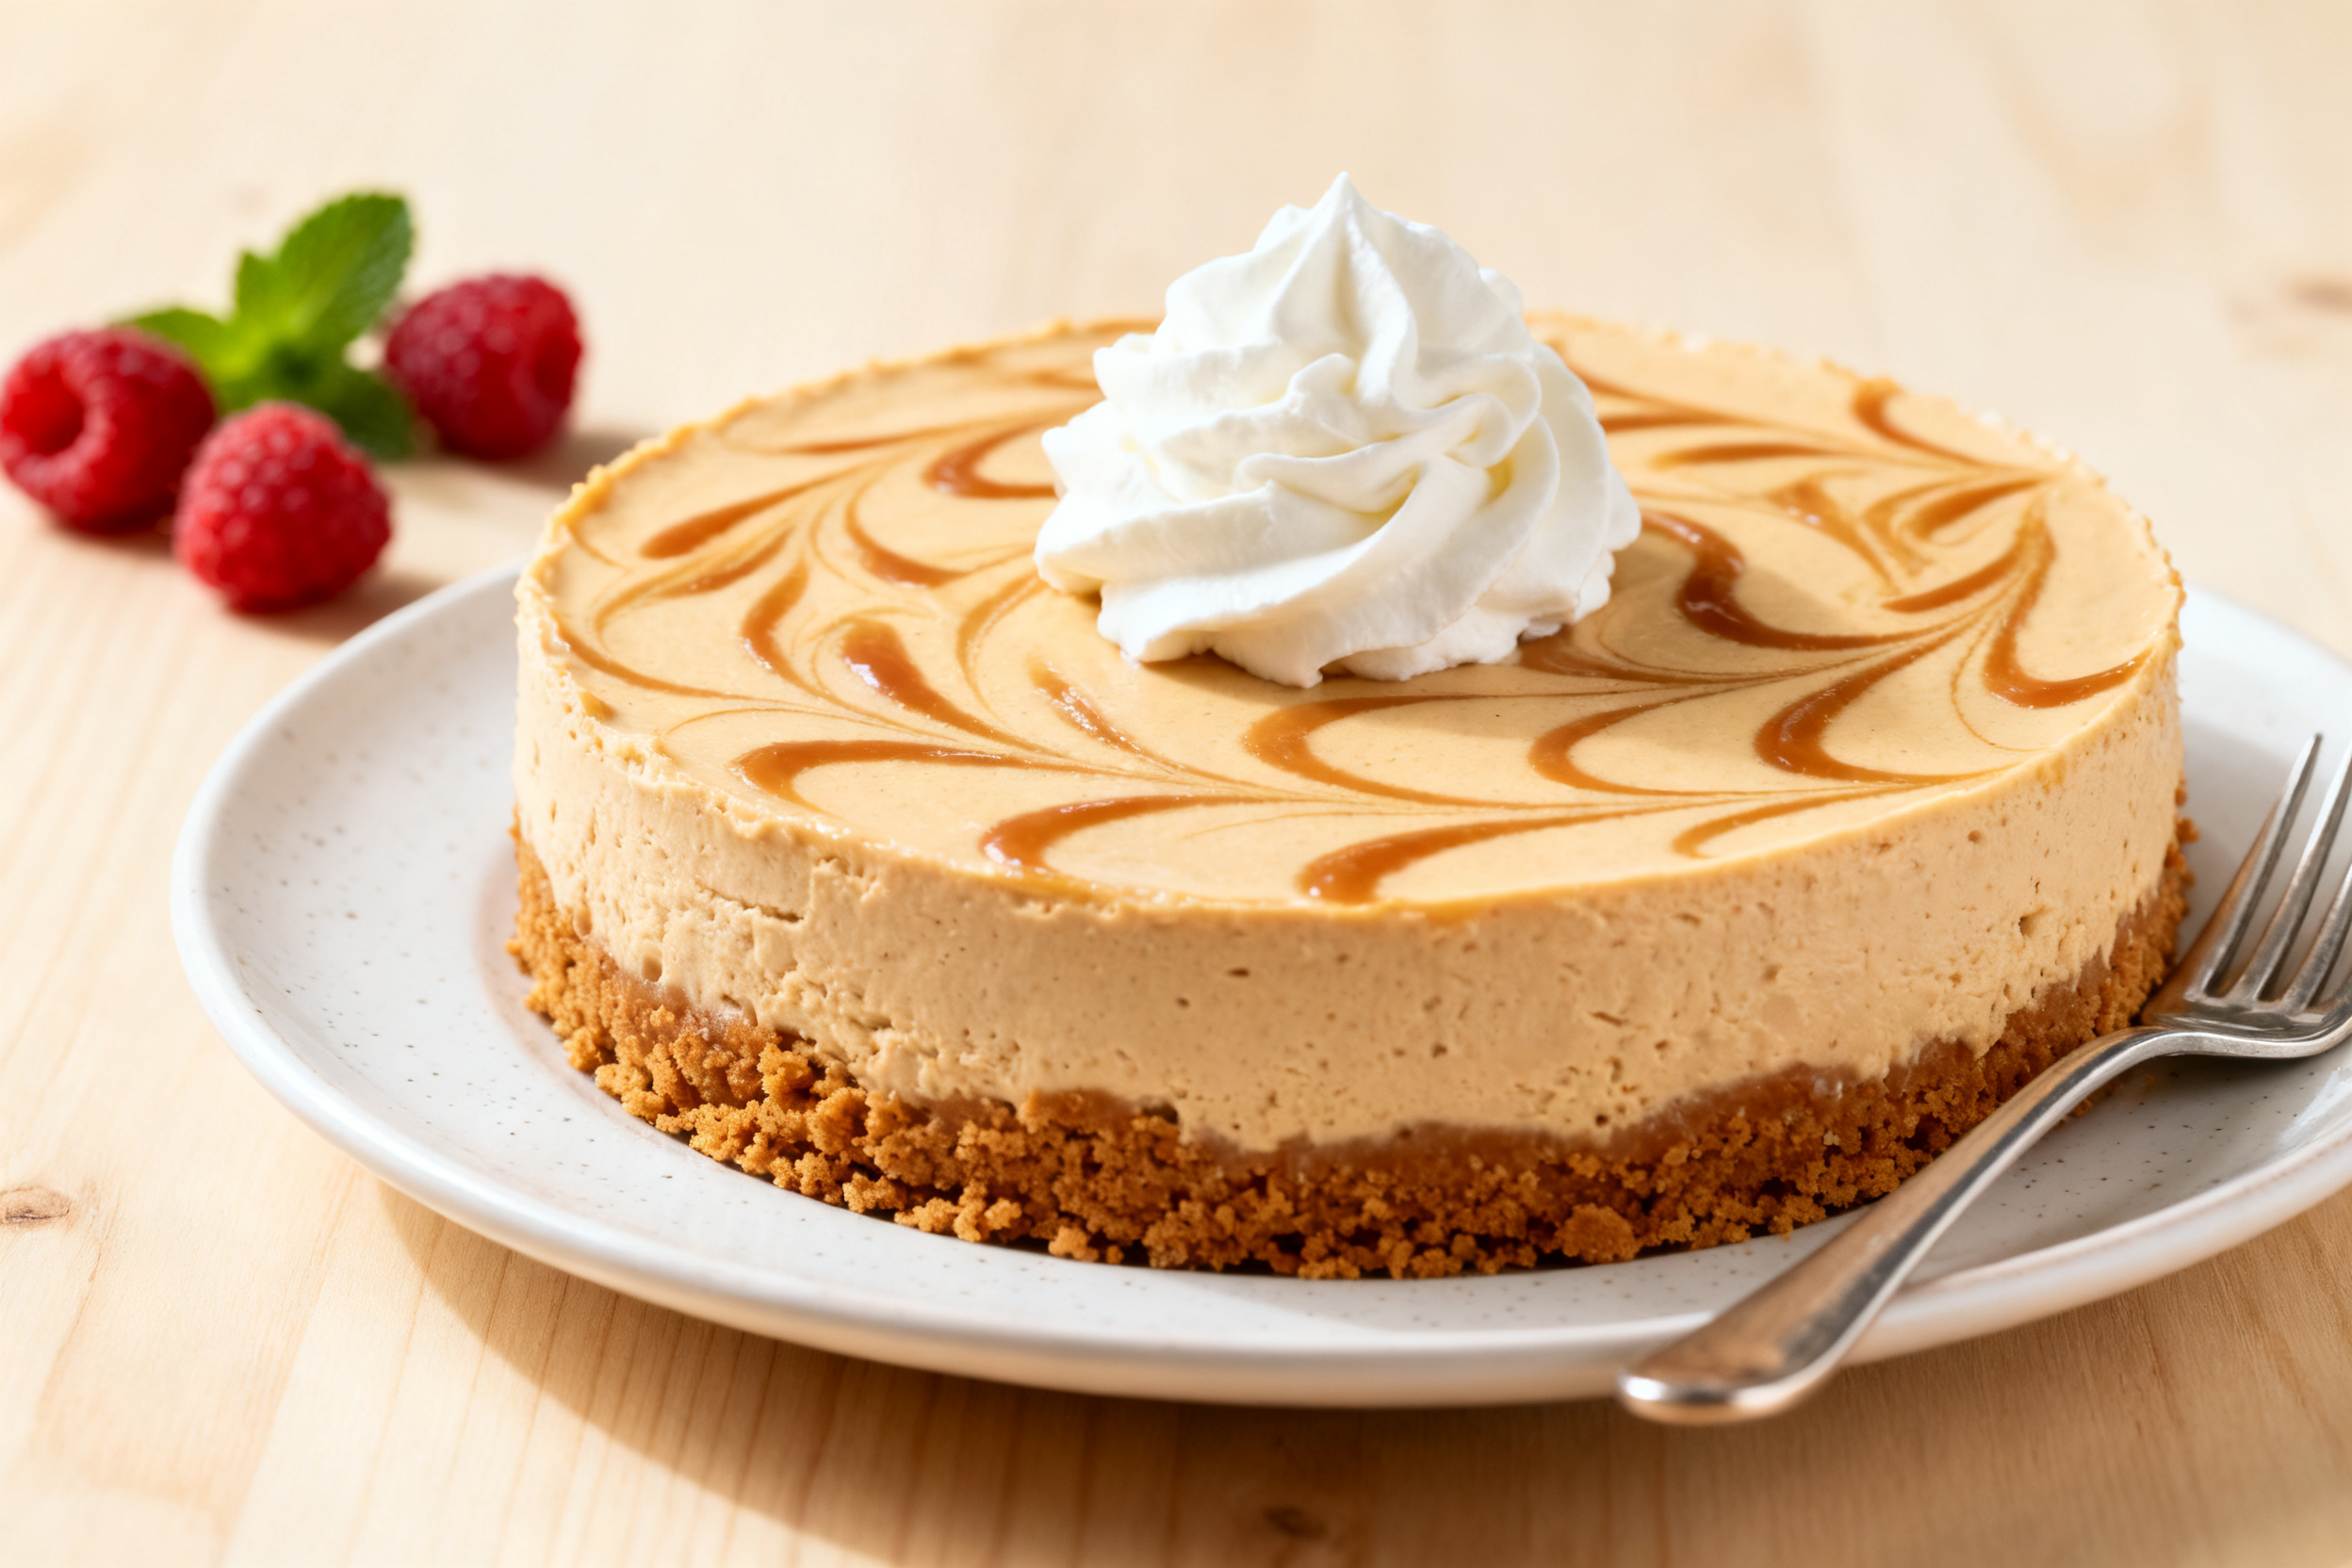
No-Bake Biscoff Cheesecake – Creamy, Caramelly, and Effortless
If you love the warm, spiced flavor of Biscoff cookies and the silky richness of cheesecake, this dessert brings the best of both. It’s creamy, sweet, and full of that caramelized cookie taste, all without turning on the oven. The crust is simple, the filling is smooth, and the topping seals the deal with a glossy Biscoff finish.
It looks impressive on the table but comes together with everyday tools and a bit of chilling time. Great for gatherings, birthdays, or a cozy night in.
No-Bake Biscoff Cheesecake – Creamy, Caramelly, and Effortless
Ingredients
Method
- Prep your pan. Line the base of a 9-inch (23 cm) springform pan with parchment.Lightly grease the sides if you like cleaner edges.
- Make the crust. Crush the Biscoff cookies into fine crumbs using a food processor or a zip-top bag and rolling pin. Stir in the melted butter until the mixture resembles wet sand.
- Press and chill. Tip the crumbs into the pan and press firmly into an even base, pushing a bit up the sides if you prefer. Use a flat-bottomed glass for a tight, even crust.Chill for 20 minutes while you make the filling.
- Beat the cream cheese. In a large bowl, beat the cream cheese until smooth and fluffy, about 2 minutes. Scrape down the bowl so there are no lumps.
- Add sweetness and flavor. Mix in powdered sugar, vanilla, salt, and 120 g (a generous 1/3 cup) of Biscoff spread. Beat until silky and well combined.
- Whip the cream. In a separate bowl, whip the cold heavy cream to medium-stiff peaks.It should hold shape but still look smooth, not grainy.
- Fold gently. Add one-third of the whipped cream to the cheesecake mixture and fold to loosen. Fold in the rest until the filling is airy and uniform. Avoid overmixing.
- Fill the pan. Spoon the filling over the chilled crust.Smooth the top with an offset spatula. Tap the pan lightly on the counter to release trapped air.
- Chill to set. Cover and refrigerate for at least 6 hours, preferably overnight, until firm enough to slice.
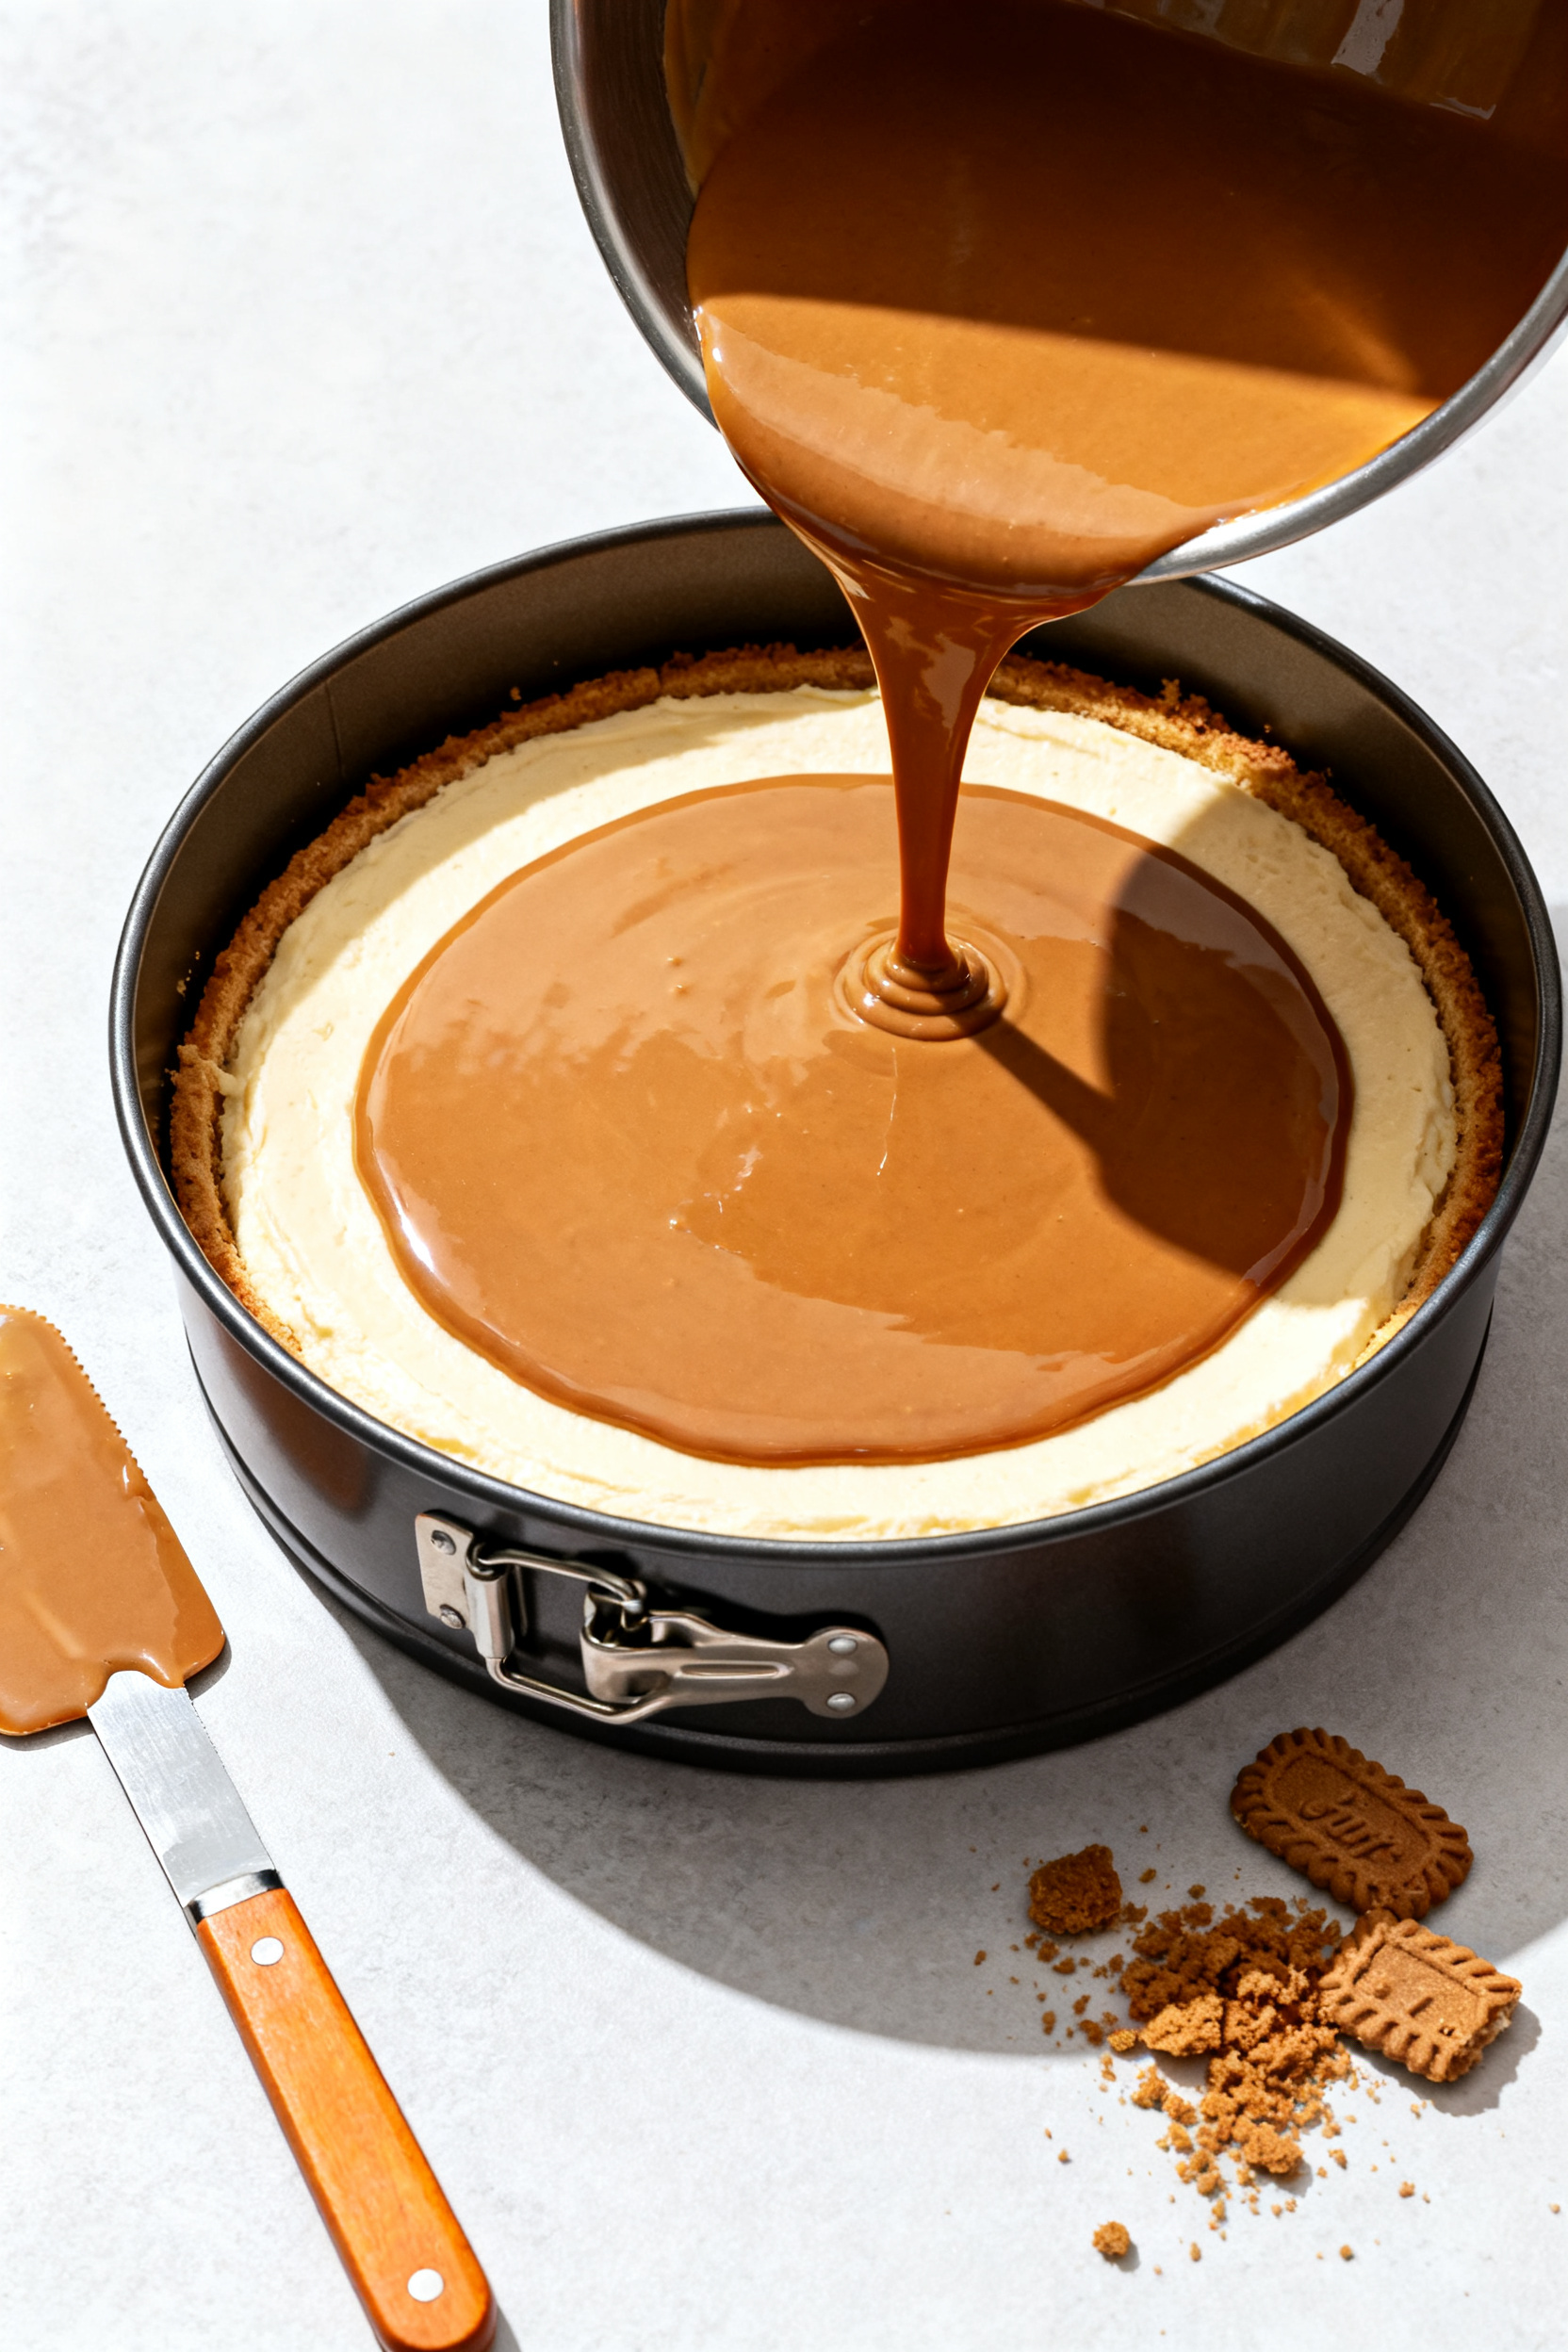
- Make the Biscoff topping. Warm the remaining Biscoff spread (about 80 g/1/4 cup) in short bursts in the microwave or over a double boiler until pourable but not hot. Cool slightly so it’s warm and fluid, not scorching.
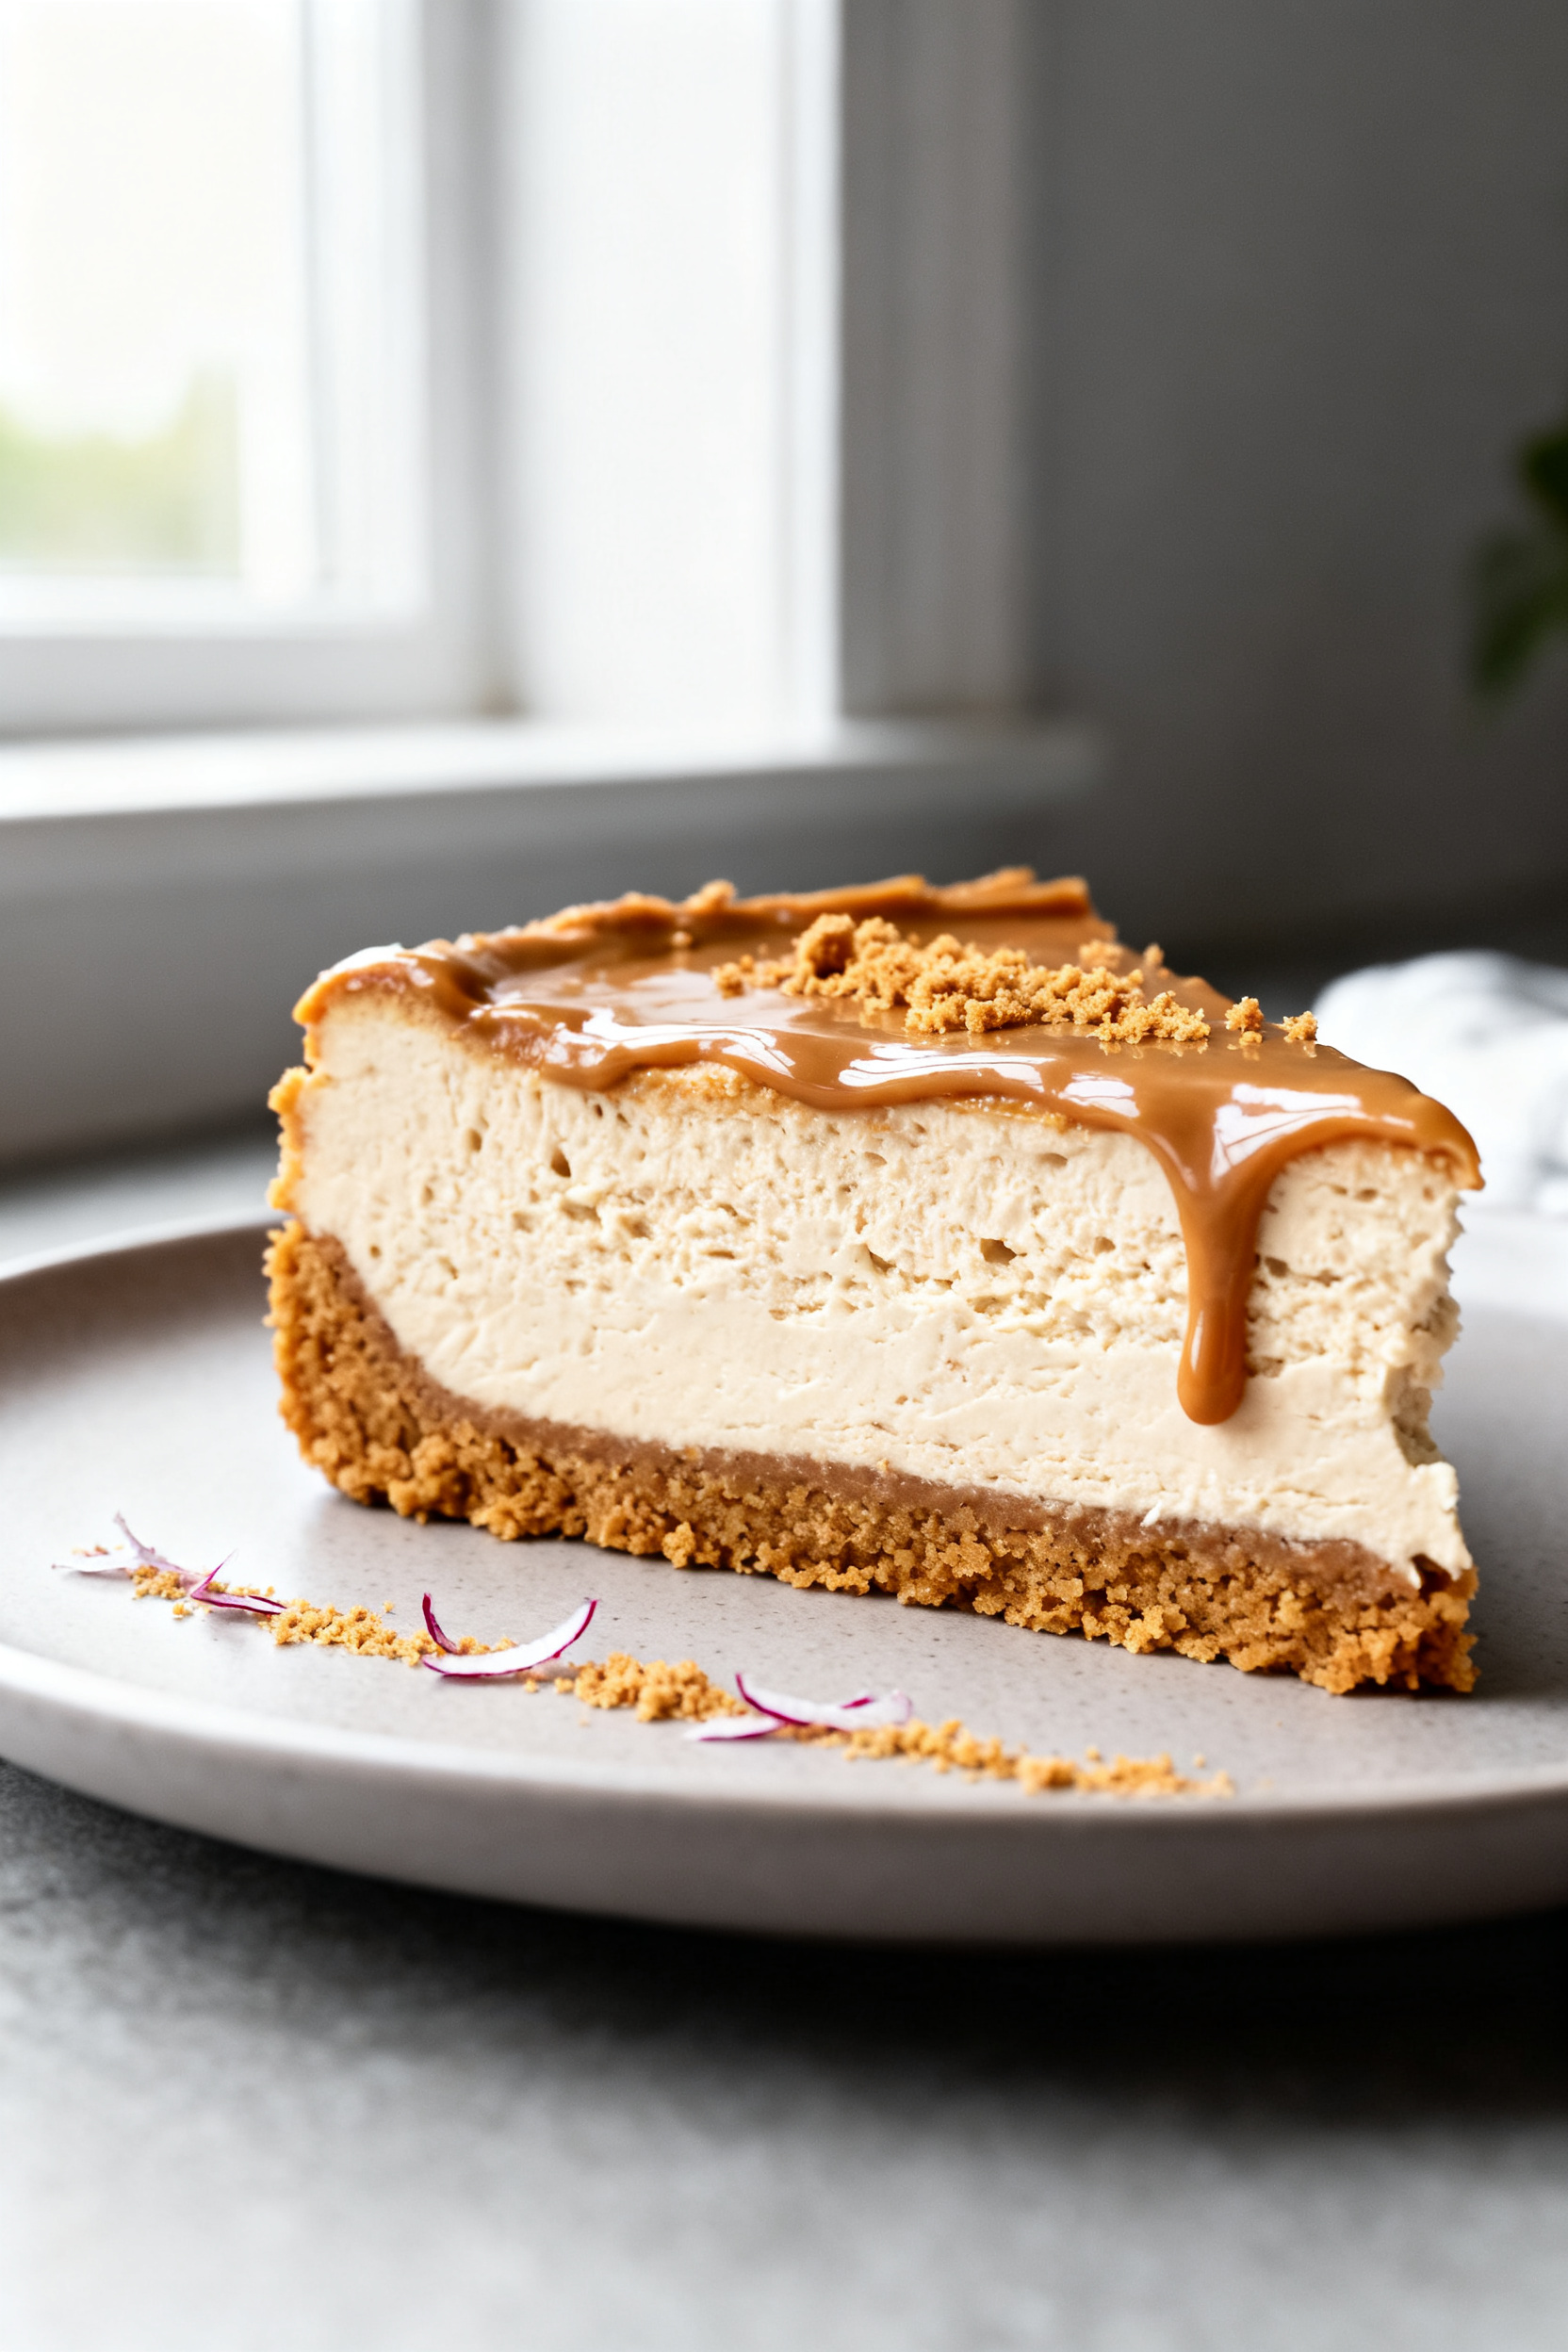
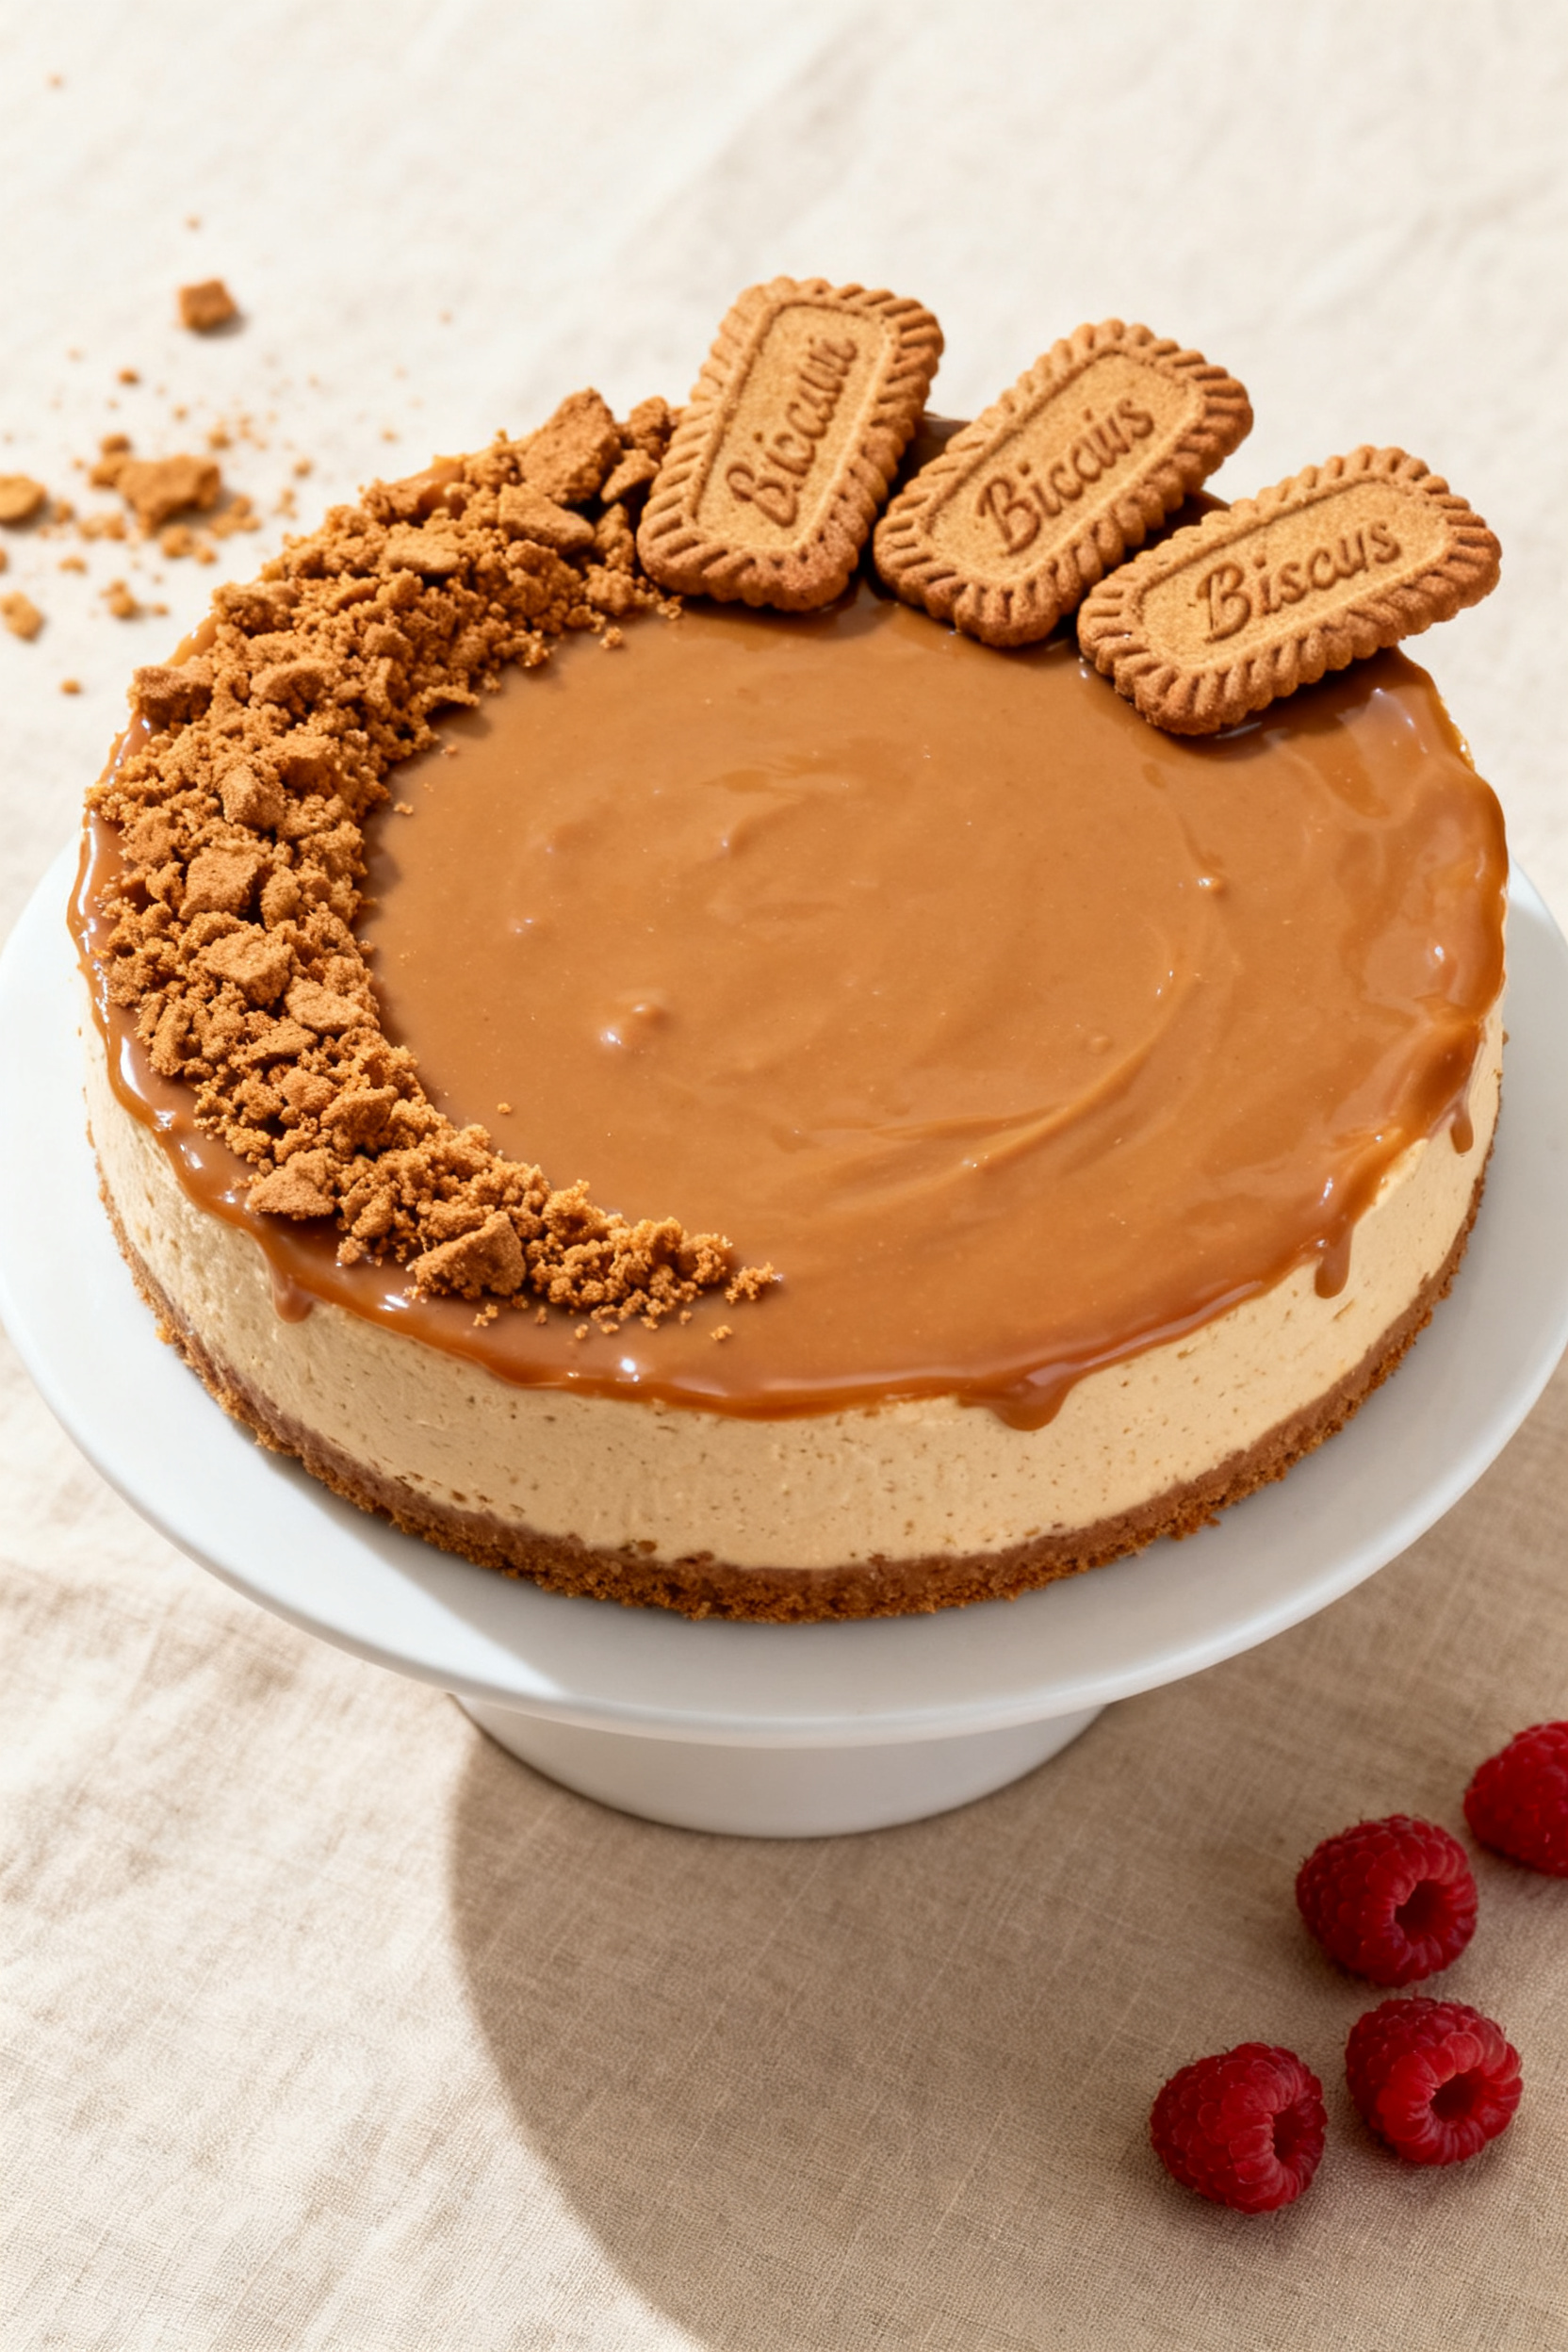
- Finish and garnish. Run a thin knife around the cake, release the springform, and slide the cheesecake onto a serving plate.Pour the warm Biscoff over the top and tilt the cake gently to create a smooth glaze. Garnish with crushed cookies or a few whole ones along the edge.
- Slice and serve. For clean slices, warm a sharp knife under hot water, wipe dry, cut, and repeat between slices.
What Makes This Special
There are plenty of no-bake cheesecakes, but Biscoff takes it up a notch with deep caramel notes and gentle cinnamon warmth. The cookie crust packs a satisfying crunch that balances the velvet filling.
A layer of melted Biscoff spread on top ties every bite together. Best of all, this recipe uses simple steps and common ingredients. You get bakery-level results with minimal effort.
What You’ll Need (Ingredients)
- Biscoff cookies (Lotus biscuits): About 300 g (10.5 oz) for the crust
- Unsalted butter: 110 g (1/2 cup), melted
- Cream cheese: 600 g (about 21 oz), full-fat, room temperature
- Biscoff spread (cookie butter): 200 g (about 3/4 cup), divided (some for filling, some for topping)
- Powdered sugar: 100 g (3/4 cup), sifted
- Vanilla extract: 1 teaspoon
- Heavy cream (double cream/whipping cream): 300 ml (1 1/4 cups), cold
- Pinch of salt: Optional, but helps balance sweetness
- Extra Biscoff cookies: For garnish (crumbs or whole cookies)
Step-by-Step Instructions
- Prep your pan. Line the base of a 9-inch (23 cm) springform pan with parchment.
Lightly grease the sides if you like cleaner edges.
- Make the crust. Crush the Biscoff cookies into fine crumbs using a food processor or a zip-top bag and rolling pin. Stir in the melted butter until the mixture resembles wet sand.
- Press and chill. Tip the crumbs into the pan and press firmly into an even base, pushing a bit up the sides if you prefer. Use a flat-bottomed glass for a tight, even crust.
Chill for 20 minutes while you make the filling.
- Beat the cream cheese. In a large bowl, beat the cream cheese until smooth and fluffy, about 2 minutes. Scrape down the bowl so there are no lumps.
- Add sweetness and flavor. Mix in powdered sugar, vanilla, salt, and 120 g (a generous 1/3 cup) of Biscoff spread. Beat until silky and well combined.
- Whip the cream. In a separate bowl, whip the cold heavy cream to medium-stiff peaks.
It should hold shape but still look smooth, not grainy.
- Fold gently. Add one-third of the whipped cream to the cheesecake mixture and fold to loosen. Fold in the rest until the filling is airy and uniform. Avoid overmixing.
- Fill the pan. Spoon the filling over the chilled crust.
Smooth the top with an offset spatula. Tap the pan lightly on the counter to release trapped air.
- Chill to set. Cover and refrigerate for at least 6 hours, preferably overnight, until firm enough to slice.
- Make the Biscoff topping. Warm the remaining Biscoff spread (about 80 g/1/4 cup) in short bursts in the microwave or over a double boiler until pourable but not hot. Cool slightly so it’s warm and fluid, not scorching.
- Finish and garnish. Run a thin knife around the cake, release the springform, and slide the cheesecake onto a serving plate.
Pour the warm Biscoff over the top and tilt the cake gently to create a smooth glaze. Garnish with crushed cookies or a few whole ones along the edge.
- Slice and serve. For clean slices, warm a sharp knife under hot water, wipe dry, cut, and repeat between slices.
How to Store
Keep the cheesecake covered in the refrigerator for up to 4–5 days. The crust stays crisp if well-chilled and sealed.
For longer storage, slice and freeze individual pieces tightly wrapped for up to 1 month. Thaw in the fridge for a few hours before serving. Avoid leaving it at room temperature for more than 1 hour.
Benefits of This Recipe
- No oven needed: Perfect for warm days or small kitchens.
- Make-ahead friendly: It sets in the fridge, so you can prep it the night before guests arrive.
- Reliable texture: Whipped cream provides structure without gelatin, keeping it light yet sliceable.
- Foolproof flavor: Biscoff delivers rich caramel-spice notes that pair naturally with cream cheese.
- Simple ingredients: Everything is easy to find at most grocery stores.
What Not to Do
- Don’t use low-fat cream cheese. It can make the filling loose and grainy.
- Don’t skip chilling time. The cake needs several hours to set or it will slump when sliced.
- Don’t overwhip the cream. Grainy, overwhipped cream leads to a dense, broken filling.
- Don’t pour hot topping. Very hot Biscoff can melt the surface of the cheesecake and create cracks.
- Don’t crush the crust too coarsely. Large chunks prevent a tight base and cause crumbling.
Variations You Can Try
- Chocolate swirl: Melt 60 g (2 oz) dark chocolate, cool slightly, and ripple it through the filling before chilling.
- Salted caramel twist: Add 1–2 tablespoons of caramel sauce to the filling and finish with a light sprinkle of flaky sea salt on top.
- Espresso kick: Dissolve 1 teaspoon instant espresso in 1 tablespoon hot water, cool, and mix into the filling for a coffee-shop vibe.
- Mini cheesecakes: Press crust into a lined muffin tin and fill for individual servings.
Chill 3–4 hours.
- Berry brightness: Serve with raspberries or strawberries to cut the sweetness and add color.
- Dairy-free route: Use vegan cream cheese and coconut whipping cream, and confirm your cookies and spread are dairy-free.
FAQ
Can I make this the day before?
Yes. In fact, it’s better the next day. Overnight chilling helps the filling firm up and makes slicing cleaner.
What if I don’t have a springform pan?
Use a deep pie dish or an 8-inch square pan lined with parchment overhang for easy lifting.
Slices may be a bit more rustic, but it works.
How do I keep the crust from crumbling?
Crush the cookies finely and press firmly. If it still seems dry, add an extra tablespoon of melted butter. Chill the crust before filling.
Can I reduce the sweetness?
Cut the powdered sugar to 70–80 g and use slightly less Biscoff in the filling.
A pinch more salt and fresh berries on top also balance sweetness.
Will it set without gelatin?
Yes. The combination of full-fat cream cheese and whipped cream sets nicely when chilled. Be sure to whip the cream to medium-stiff peaks and chill long enough.
Can I use a hand mixer instead of a stand mixer?
Absolutely.
A hand mixer is perfect for both the cream cheese and the whipped cream. Just don’t rush the whipping stage.
What’s the best way to melt Biscoff for the topping?
Microwave in 10–15 second bursts, stirring between each, until smooth and pourable. Let it cool slightly before pouring over the cake.
Why is my filling lumpy?
Your cream cheese was likely too cold.
Start with room-temperature cream cheese and beat until completely smooth before adding other ingredients.
Can I make it gluten-free?
Use certified gluten-free speculoos-style cookies and a gluten-free cookie butter alternative if needed. The rest of the ingredients are naturally gluten-free.
How many servings does this make?
A 9-inch cheesecake serves about 12 modest slices or 8 generous ones. It’s rich, so smaller portions go a long way.
In Conclusion
This No-Bake Biscoff Cheesecake delivers big flavor with minimal fuss.
The spiced cookie crust, creamy filling, and glossy topping create a dessert that tastes as good as it looks. Make it ahead, keep it chilled, and bring it out when you’re ready to impress. One smooth slice, and you’ll see why this is a keeper for holidays, potlucks, and weeknight treats alike.
Printable Recipe Card
Want just the essential recipe details without scrolling through the article? Get our printable recipe card with just the ingredients and instructions.