Cookies and Cream Cheesecake – Creamy, Crunchy, Crowd-Pleasing
If you love the classic cookies-and-cream combo, this cheesecake is the ultimate treat. It’s rich and creamy with plenty of cookie crunch in every bite, and it looks so pretty on the table without any fancy decorating skills. The crust is chocolatey and buttery, the filling is smooth, and the swirls of crushed cookies make it feel special.
It’s the kind of dessert that makes people smile before they even take a bite. Best of all, it’s simple enough for beginners but impressive enough for a celebration.
Cookies and Cream Cheesecake – Creamy, Crunchy, Crowd-Pleasing
Ingredients
Method
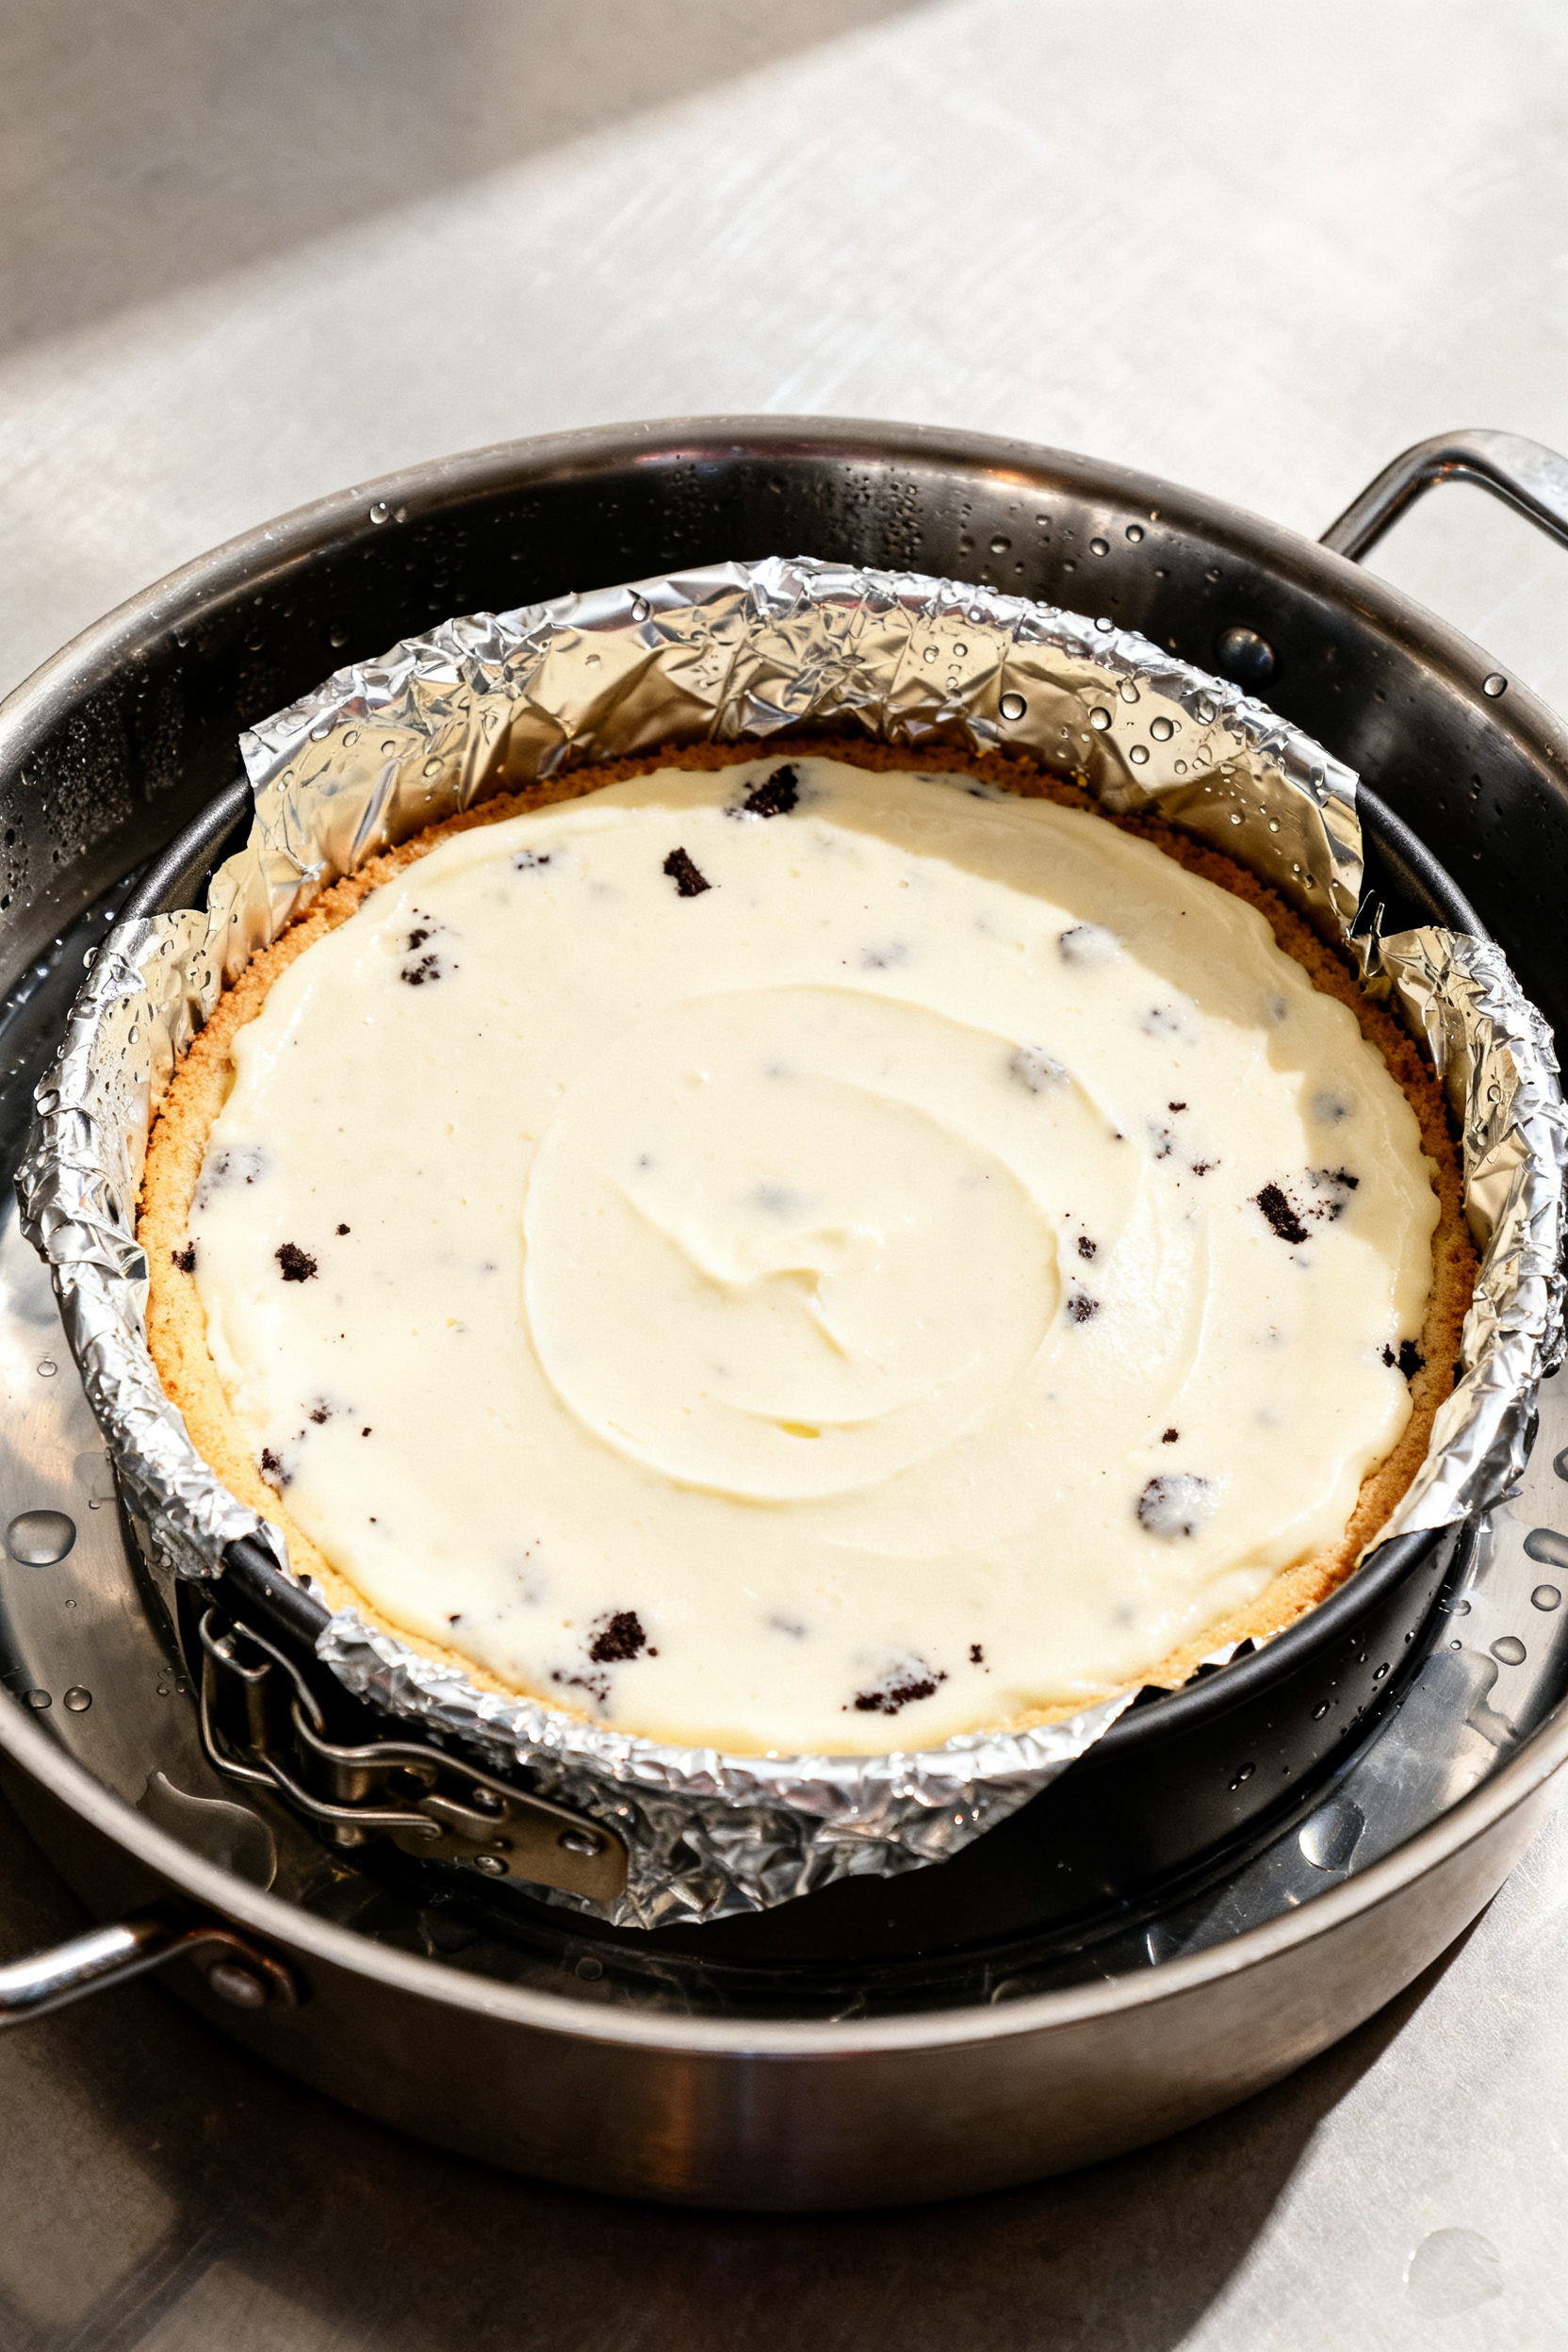
- Prep the pan and oven: Heat the oven to 325°F (163°C). Line the bottom of a 9-inch springform pan with parchment if you want easy release.Wrap the outside of the pan with two layers of heavy-duty foil to keep water out during the water bath.
- Make the crust: Crush 24 chocolate sandwich cookies into fine crumbs (a food processor is quickest). Stir in melted butter until it feels like wet sand. Press firmly into the bottom of the pan and slightly up the sides.
- Par-bake the crust: Bake the crust for 8–10 minutes.Remove and cool while you make the filling. Keep the oven at 325°F.
- Beat the cream cheese: In a large bowl, beat cream cheese on medium speed until super smooth, about 2 minutes. Scrape the bowl.Add sugar and salt and beat another minute until glossy and lump-free.
- Add the dairy and vanilla: Mix in sour cream, heavy cream, and vanilla until just combined. Don’t whip too much air into the batter—keep the mixer on low to medium-low once the base is smooth.
- Add the eggs: Beat in eggs one at a time on low speed, scraping the bowl after each addition. Stop mixing as soon as the last egg disappears into the batter.
- Fold in cookies: Roughly chop or crush 10–12 cookies.Fold them gently into the batter with a spatula so they don’t disintegrate. You want chunky bits and some crumbs.
- Assemble the water bath: Place the foil-wrapped pan in a large roasting pan. Pour the cheesecake batter onto the crust and smooth the top.Pour hot water into the roasting pan until it reaches halfway up the sides of the springform.
- Bake: Bake for 60–75 minutes. The edges should be set, and the center should jiggle like Jell-O, not slosh. If it browns too fast, tent the top loosely with foil for the last 15 minutes.
- Cool gradually: Turn off the oven, crack the door, and let the cheesecake sit for 45–60 minutes.Remove from the water bath, take off the foil, and cool on a rack until barely warm.
- Chill fully: Run a knife around the edge to loosen, then cover and chill at least 6 hours, preferably overnight, until very cold and set.
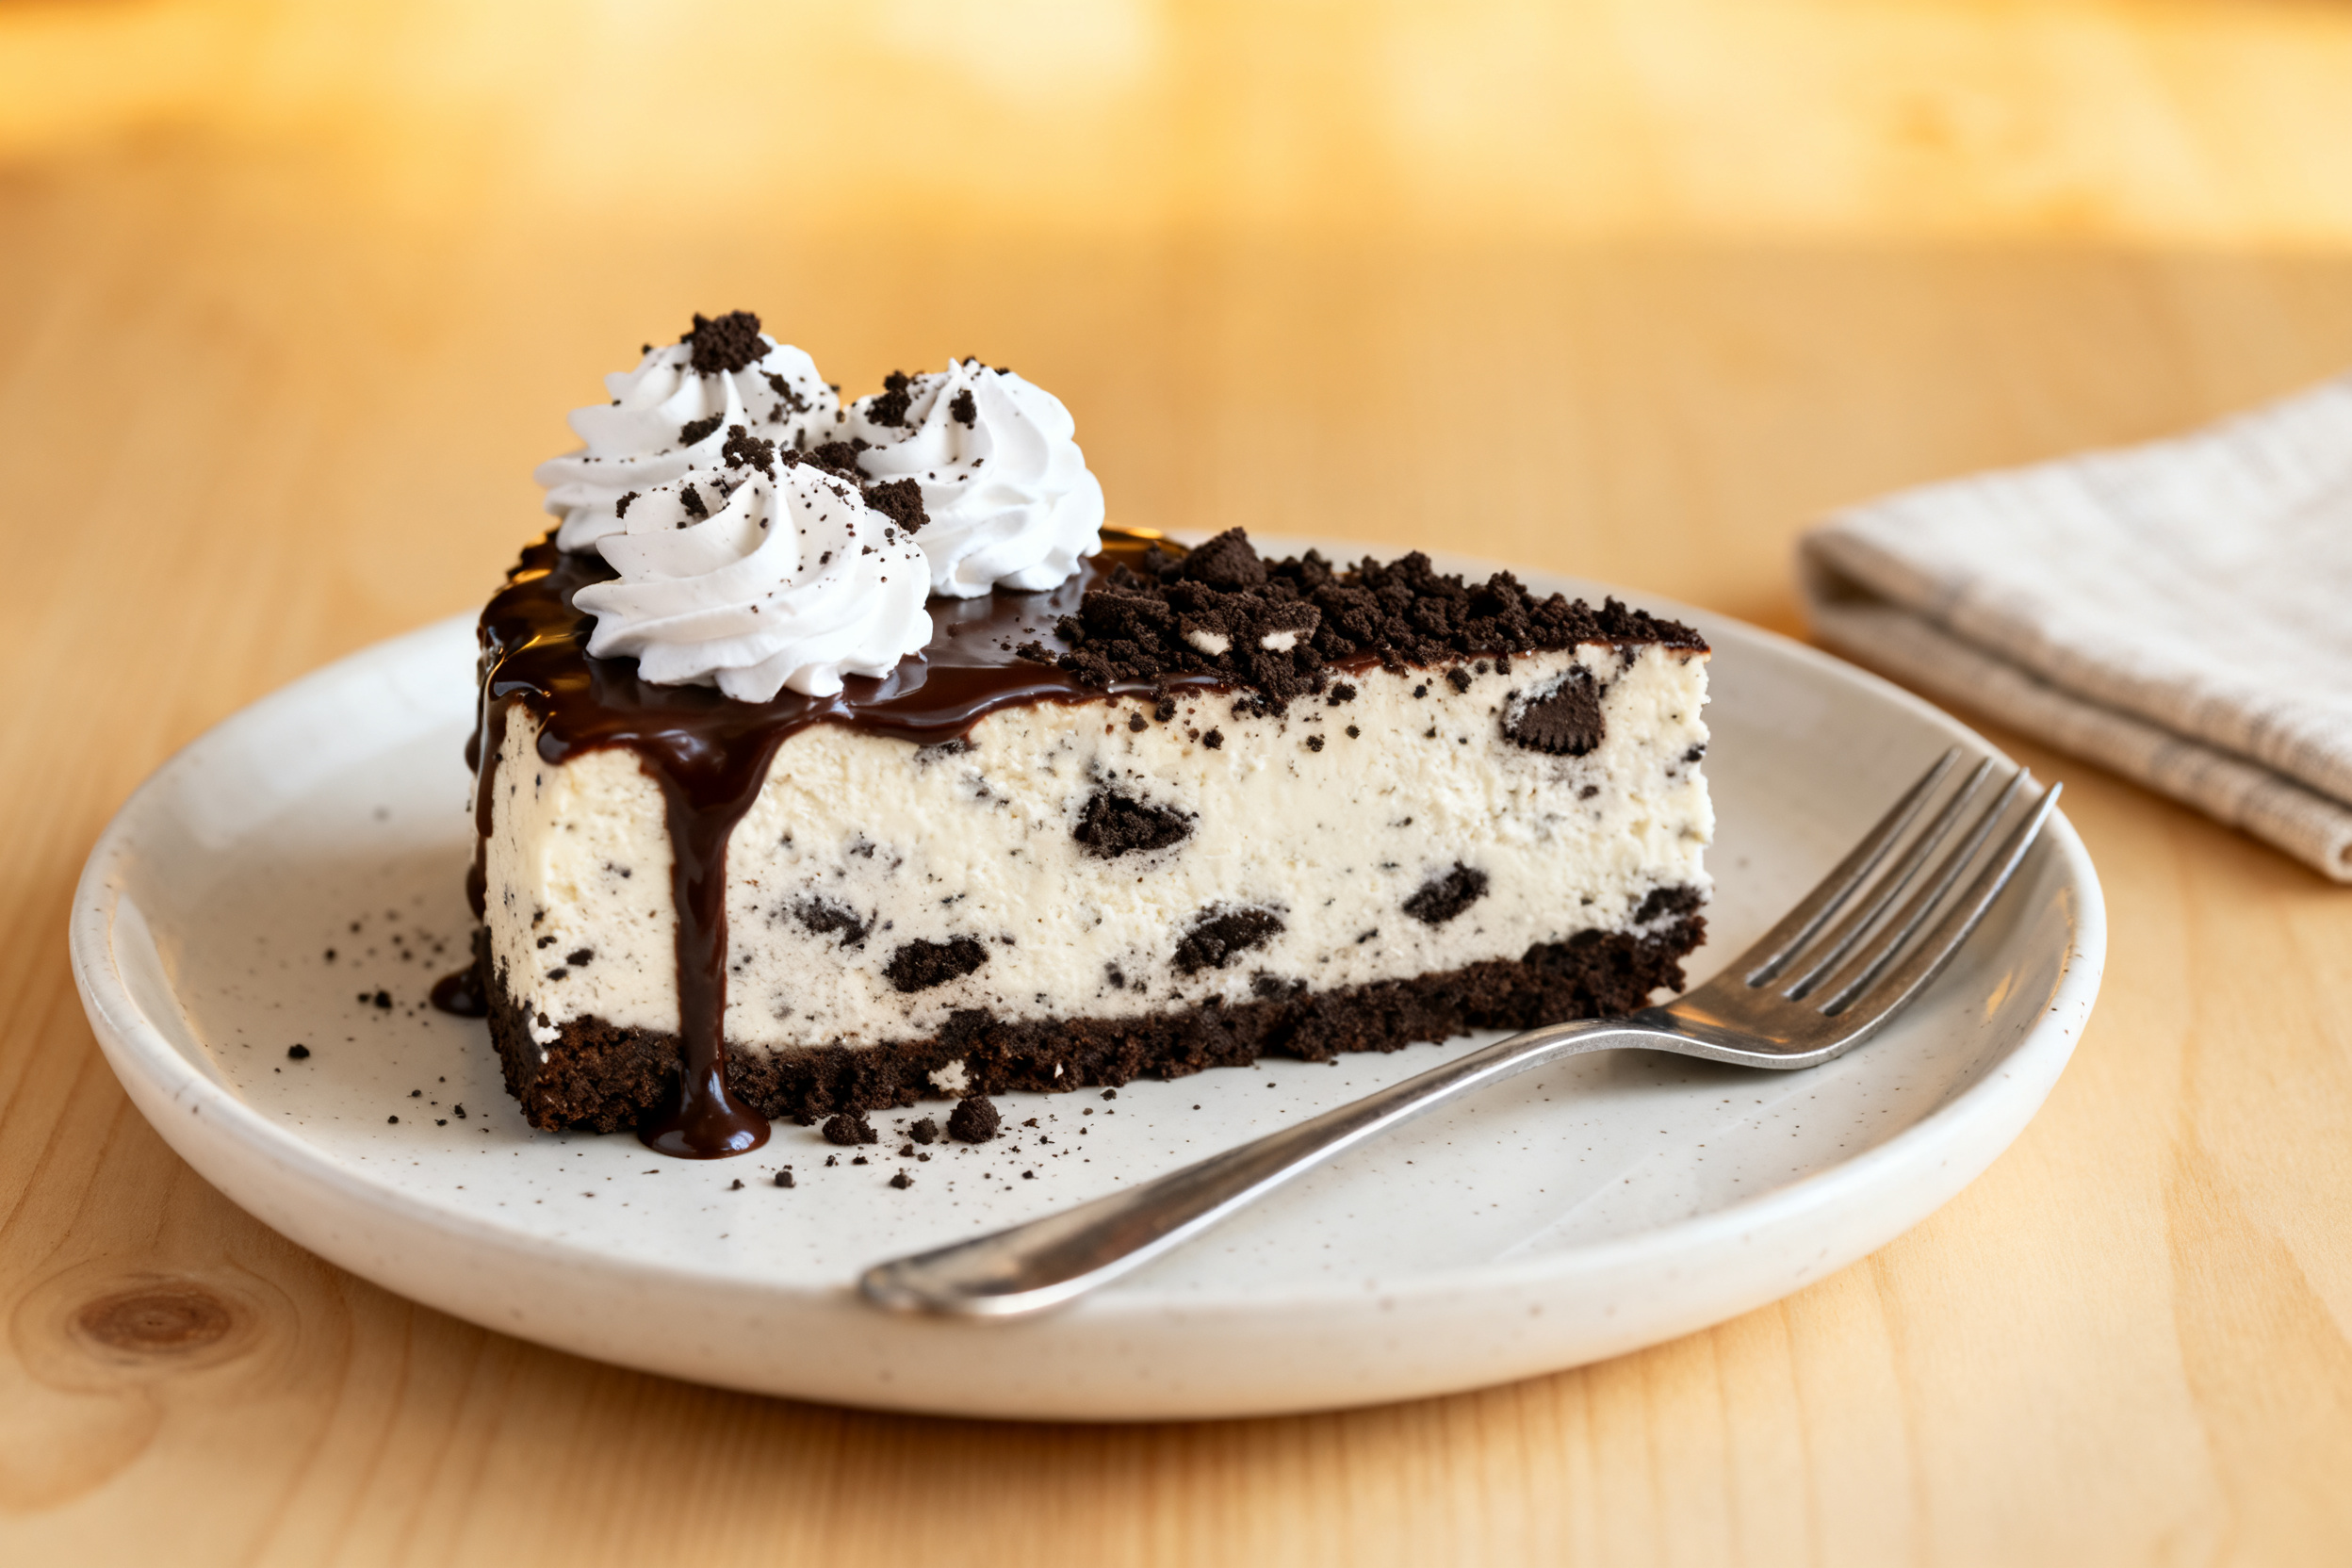
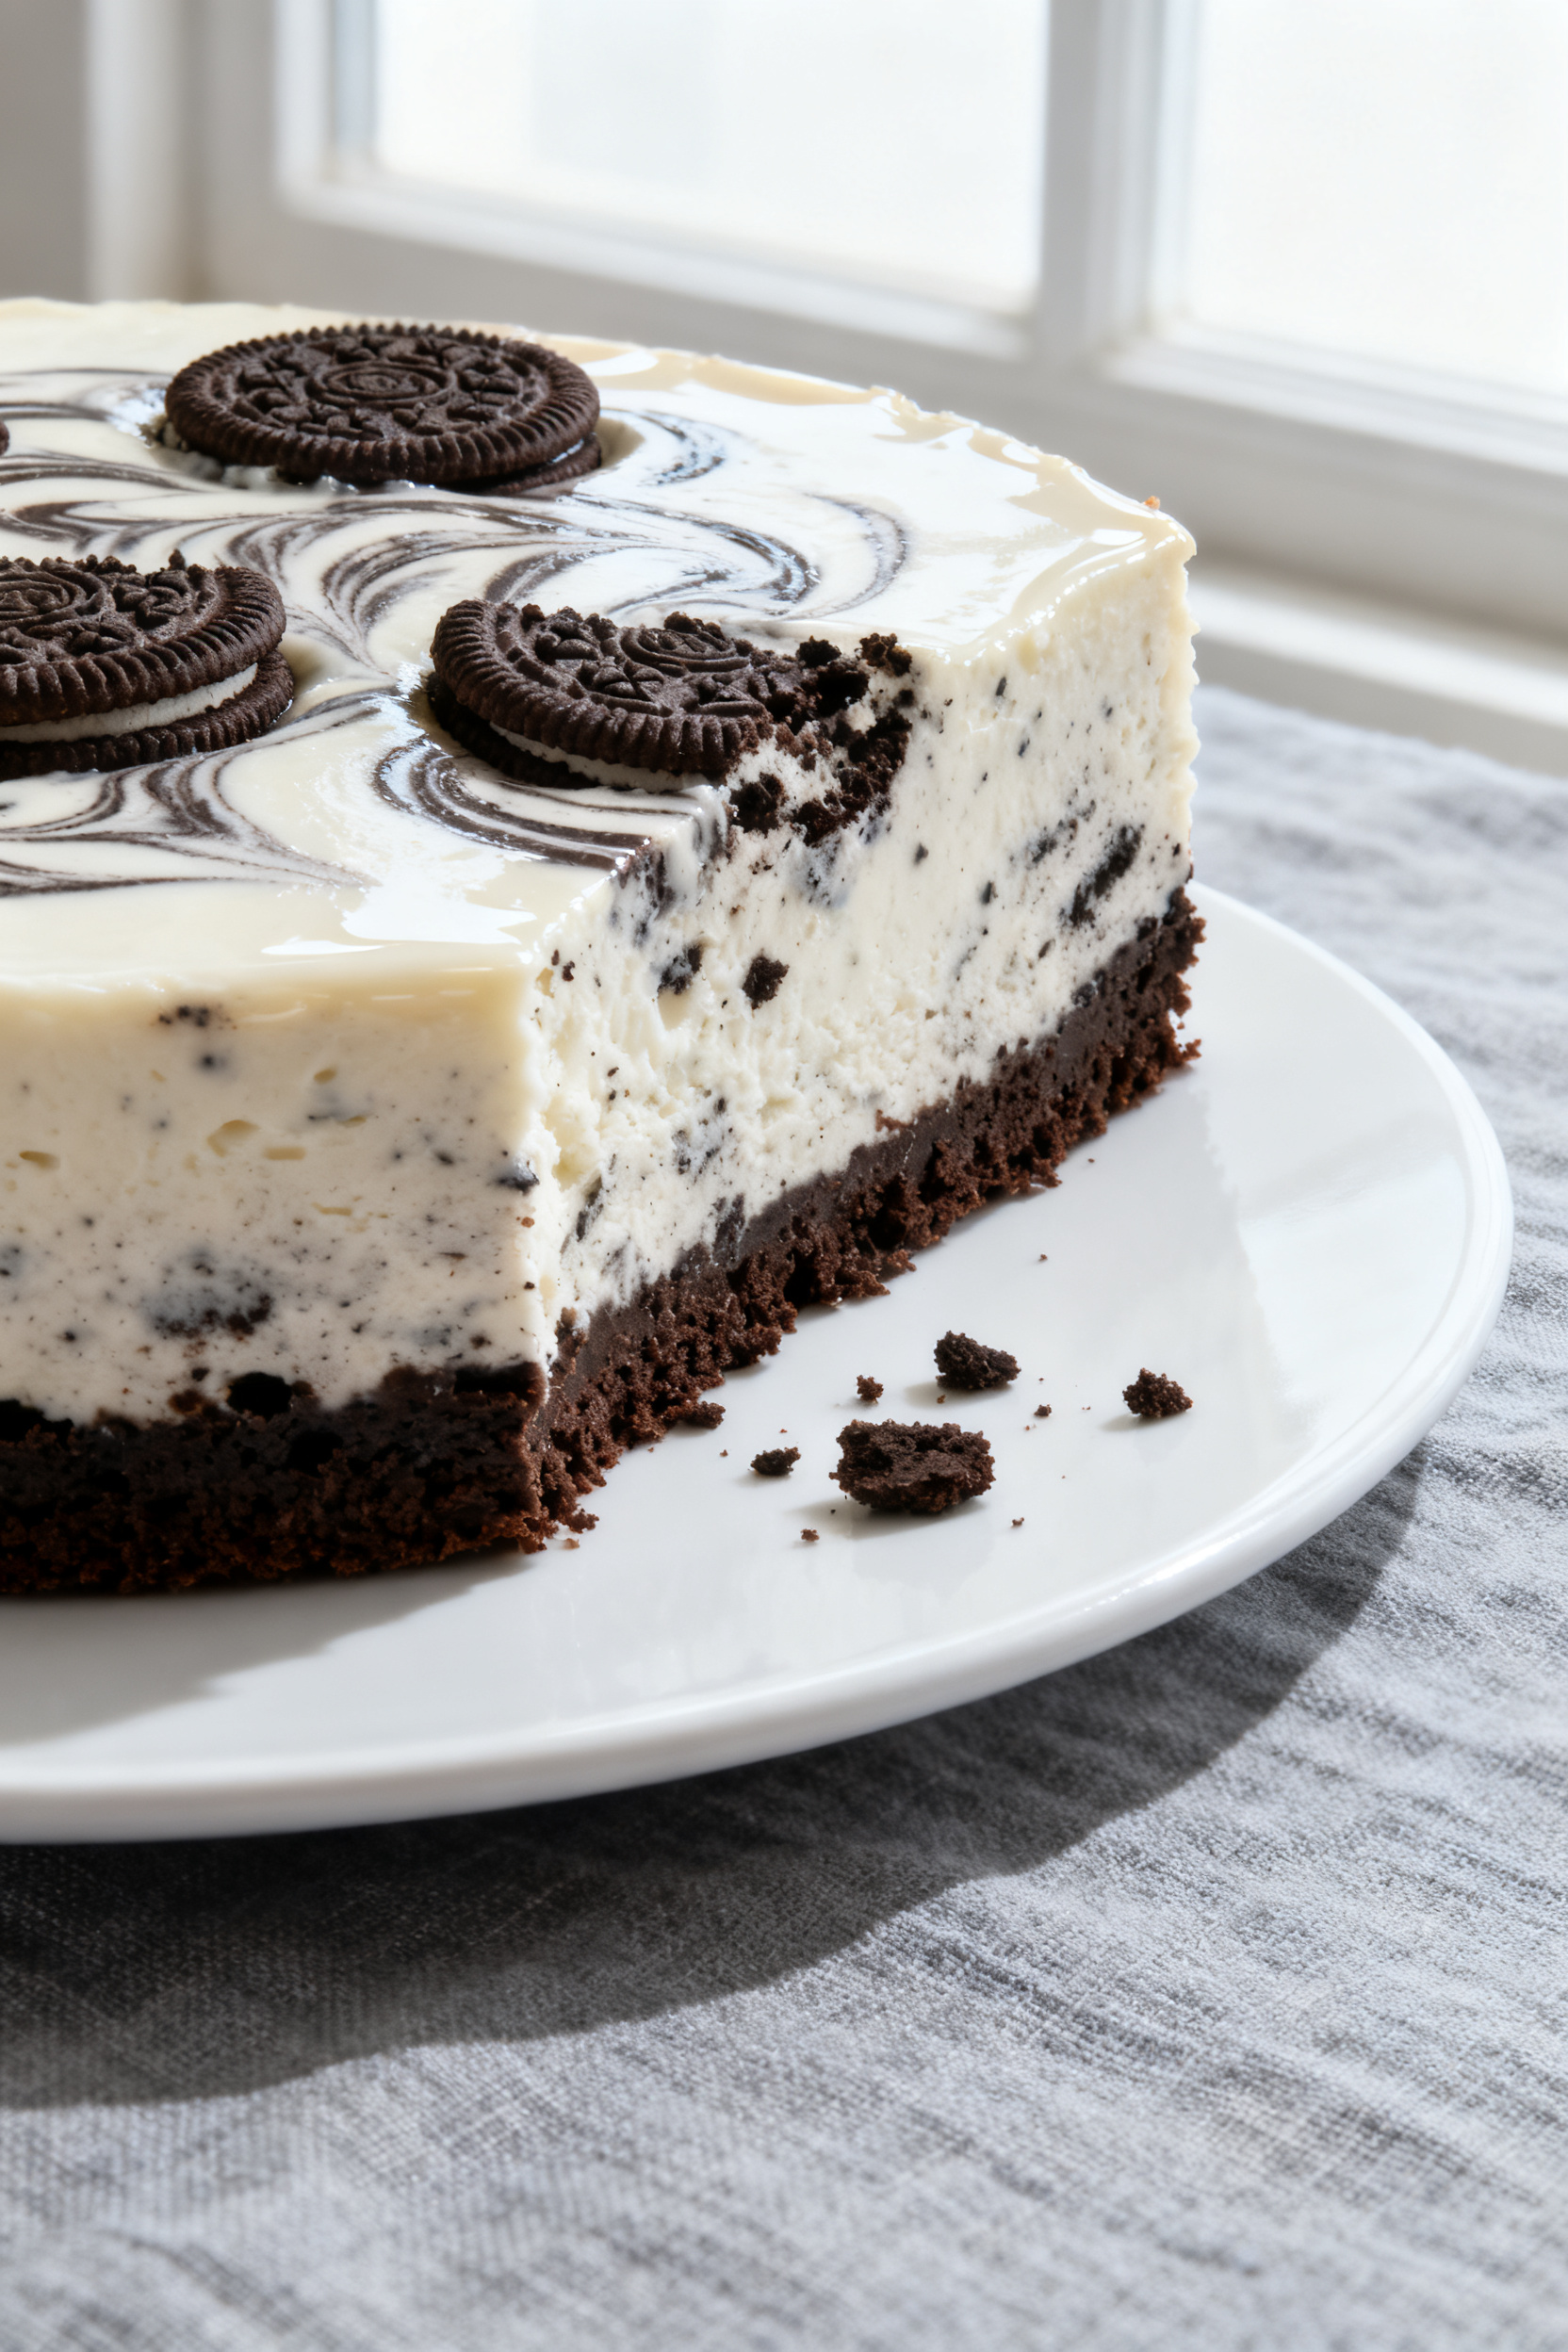
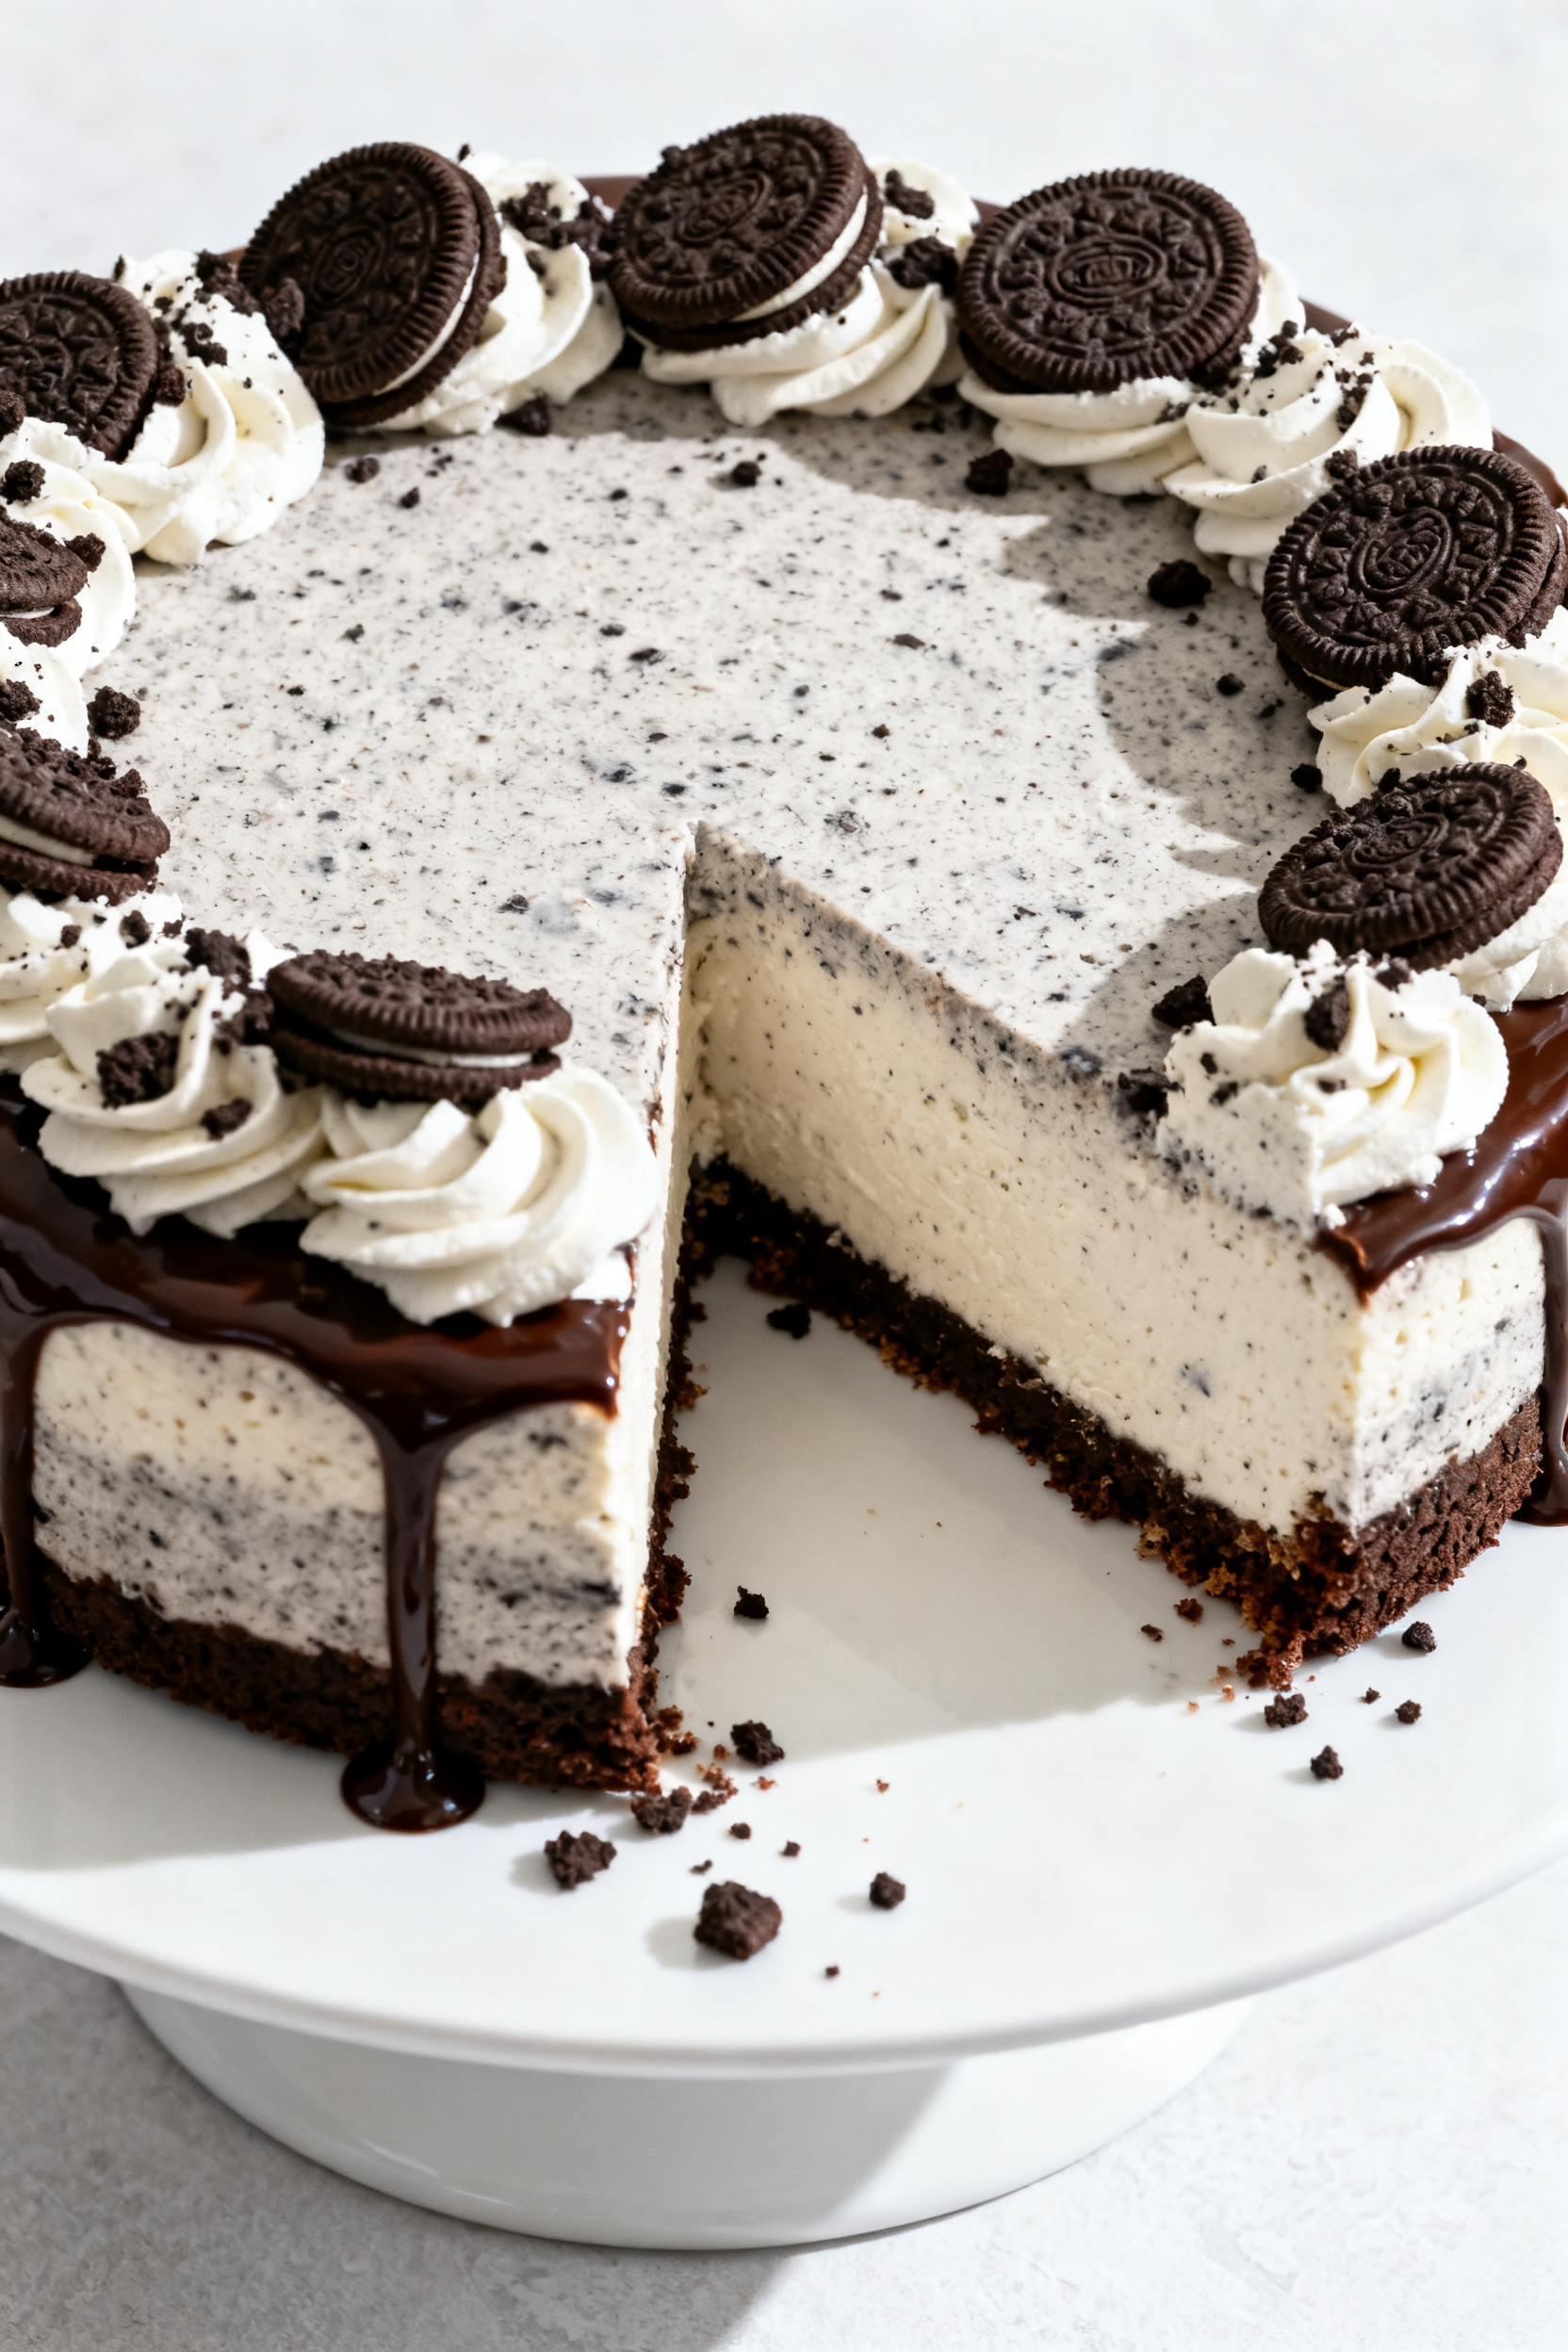
- Finish and serve: Release the springform ring. Top with whipped cream, more crushed cookies, or a light chocolate drizzle. Slice with a hot, clean knife for neat edges.
What Makes This Recipe So Good
- Foolproof texture: A few straightforward steps and a water bath help deliver a creamy, crack-free cheesecake.
- Balanced sweetness: The tang of cream cheese keeps it from feeling too sugary, even with plenty of cookie pieces.
- Crowd appeal: Cookies and cream is a flavor everyone recognizes and loves—no explanation needed.
- Make-ahead friendly: Cheesecake needs chilling, which means it’s perfect for prepping the day before an event.
- Customizable: You can use any chocolate sandwich cookie, adjust the mix-ins, and change the topping without losing the core flavor.
Shopping List (Ingredients)
- Chocolate sandwich cookies (like Oreos) – about 36–40 total, divided for crust and filling
- Unsalted butter – 6 tablespoons, melted
- Cream cheese – 32 ounces (four 8-ounce blocks), room temperature
- Granulated sugar – 1 cup
- Sour cream – 1 cup, room temperature
- Heavy cream – 1/2 cup, room temperature
- Vanilla extract – 2 teaspoons
- Large eggs – 4, room temperature
- Salt – 1/4 teaspoon
- Optional toppings: Extra crushed cookies, whipped cream, or a drizzle of chocolate sauce
- Equipment: 9-inch springform pan, roasting pan for water bath, foil, mixer, and parchment (optional)
Step-by-Step Instructions
- Prep the pan and oven: Heat the oven to 325°F (163°C). Line the bottom of a 9-inch springform pan with parchment if you want easy release.
Wrap the outside of the pan with two layers of heavy-duty foil to keep water out during the water bath.
- Make the crust: Crush 24 chocolate sandwich cookies into fine crumbs (a food processor is quickest). Stir in melted butter until it feels like wet sand. Press firmly into the bottom of the pan and slightly up the sides.
- Par-bake the crust: Bake the crust for 8–10 minutes.
Remove and cool while you make the filling. Keep the oven at 325°F.
- Beat the cream cheese: In a large bowl, beat cream cheese on medium speed until super smooth, about 2 minutes. Scrape the bowl.
Add sugar and salt and beat another minute until glossy and lump-free.
- Add the dairy and vanilla: Mix in sour cream, heavy cream, and vanilla until just combined. Don’t whip too much air into the batter—keep the mixer on low to medium-low once the base is smooth.
- Add the eggs: Beat in eggs one at a time on low speed, scraping the bowl after each addition. Stop mixing as soon as the last egg disappears into the batter.
- Fold in cookies: Roughly chop or crush 10–12 cookies.
Fold them gently into the batter with a spatula so they don’t disintegrate. You want chunky bits and some crumbs.
- Assemble the water bath: Place the foil-wrapped pan in a large roasting pan. Pour the cheesecake batter onto the crust and smooth the top.
Pour hot water into the roasting pan until it reaches halfway up the sides of the springform.
- Bake: Bake for 60–75 minutes. The edges should be set, and the center should jiggle like Jell-O, not slosh. If it browns too fast, tent the top loosely with foil for the last 15 minutes.
- Cool gradually: Turn off the oven, crack the door, and let the cheesecake sit for 45–60 minutes.
Remove from the water bath, take off the foil, and cool on a rack until barely warm.
- Chill fully: Run a knife around the edge to loosen, then cover and chill at least 6 hours, preferably overnight, until very cold and set.
- Finish and serve: Release the springform ring. Top with whipped cream, more crushed cookies, or a light chocolate drizzle. Slice with a hot, clean knife for neat edges.
How to Store
- Refrigerate: Keep the cheesecake covered in the fridge for up to 5 days.
A cake dome or an inverted bowl helps prevent drying and fridge odors.
- Freeze slices: Wrap individual slices tightly in plastic, then foil, and freeze for up to 2 months. Thaw overnight in the fridge or at room temperature for 45–60 minutes.
- Hold toppings: Add whipped cream and extra cookie crumbles right before serving so they stay crisp and fresh.
Why This is Good for You
This dessert isn’t a health food, but it can still fit into a balanced lifestyle. A small slice is satisfying, thanks to protein and fat from cream cheese, which helps you feel content with less.
Sharing a homemade treat can also encourage mindful enjoyment—you know what’s in it, and you can choose your portion. If you’re celebrating, it’s a lovely way to make the moment feel special without relying on ultra-processed bakery items.
What Not to Do
- Don’t rush the chill time: Cutting too soon leads to soft, messy slices and a weaker flavor.
- Don’t overbeat the eggs: Too much air can cause the cheesecake to puff and crack as it cools.
- Don’t skip the water bath: It evens out heat and helps prevent cracks and rubbery texture.
- Don’t use cold ingredients: Cold cream cheese forms lumps that won’t smooth out easily.
- Don’t crush all the cookies too fine: You want some chunky pieces for texture; save the powder for the crust.
Variations You Can Try
- Mint twist: Add 1/2 teaspoon peppermint extract and use mint chocolate sandwich cookies. Top with crushed peppermint candy.
- Double chocolate: Mix 1/4 cup cocoa powder into the batter and add chocolate chips along with the cookies.
- Peanut butter swirl: Warm 1/3 cup creamy peanut butter until pourable and swirl into the top of the batter before baking.
- Gluten-free: Use gluten-free chocolate sandwich cookies for the crust and filling.
Ensure all other ingredients are certified gluten-free.
- No-bake version: Skip eggs and baking. Use a sturdier crust (extra butter and more crumbs), then fold cookies into a mixture of whipped cream cheese, powdered sugar, vanilla, and whipped cream. Chill 6–8 hours.
- Individual minis: Bake in a lined muffin tin with cookie crumb bases.
Reduce bake time to 18–22 minutes.
FAQ
How do I prevent cracks without a water bath?
You can bake at a slightly lower temperature (300–315°F), avoid overmixing, and cool the cheesecake slowly in the oven with the door cracked. A pan of hot water on a lower rack also helps. Still, a water bath is the most reliable method.
Can I use low-fat cream cheese?
You can, but the texture will be less creamy and more prone to weeping.
For the best result, use full-fat cream cheese. If you must lighten it, swap only half for Neufchâtel and keep the rest full-fat.
Do I need to remove the cream from the cookies?
No, keep it in. The filling melts into the crumbs for the crust and adds sweetness to the batter.
If your cheesecake runs sweet, reduce the sugar slightly by 2–3 tablespoons next time.
How do I get clean slices?
Use a long, sharp knife dipped in hot water. Wipe the blade clean between each cut. Cold cheesecake and a steady hand make all the difference.
My crust crumbles when slicing.
What went wrong?
It may need more butter or firmer packing. Make sure the crumbs are very fine for the crust, press tightly, and par-bake to set. Chill the cake fully before cutting.
Can I make it ahead?
Yes.
Cheesecake is actually better the next day. Make it up to 2 days in advance and add toppings just before serving.
What if I don’t have a springform pan?
Use a deep 9-inch cake pan lined with an overhanging parchment sling. Cool completely, then lift out carefully.
Keep in mind it’s a bit trickier to unmold cleanly.
Can I reduce the sugar?
Yes, you can cut the sugar to 3/4 cup without major texture changes. The cookies add plenty of sweetness, so the flavor will still be balanced.
In Conclusion
Cookies and Cream Cheesecake is comfort and celebration in one simple recipe. With a buttery chocolate crust, a smooth tangy filling, and plenty of cookie crunch, it’s a dessert that always feels like a treat.
Follow the steps, give it time to chill, and you’ll have a bakery-worthy cheesecake without the fuss. Serve it at birthdays, potlucks, or any night you want something a little special—this one always gets a yes.
Printable Recipe Card
Want just the essential recipe details without scrolling through the article? Get our printable recipe card with just the ingredients and instructions.