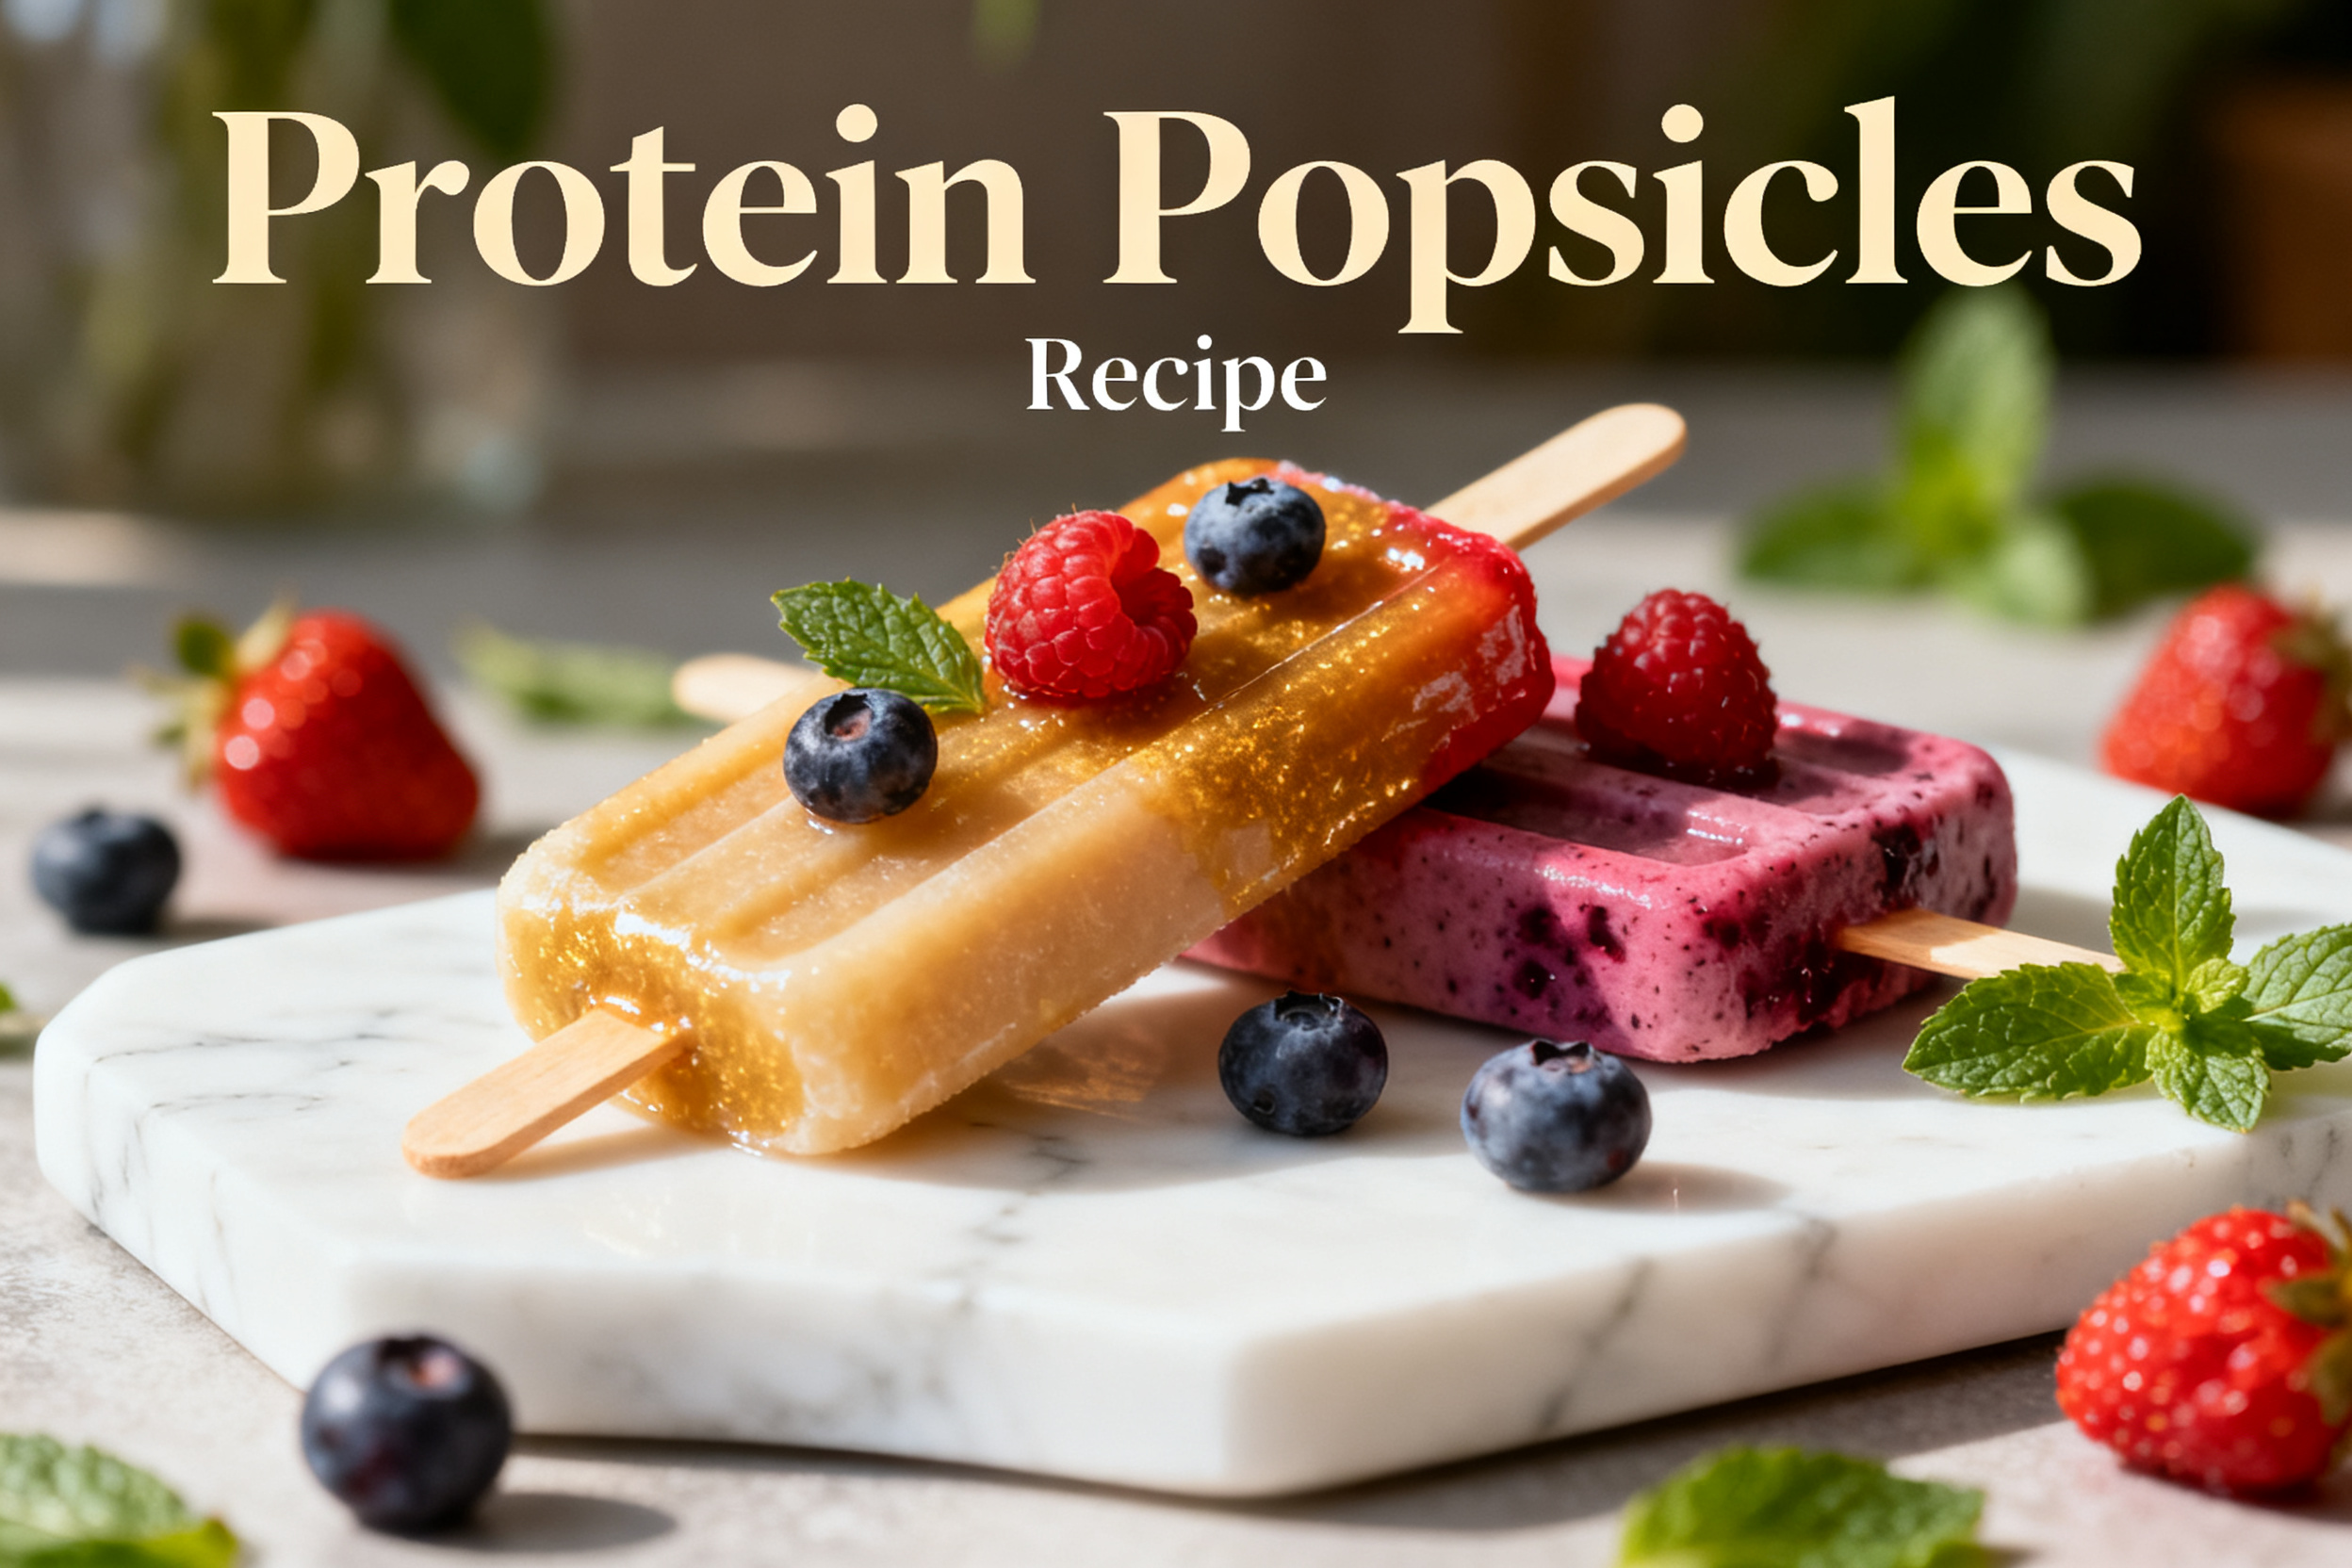
Protein Popsicles – Cool, Creamy, and Satisfying
These Protein Popsicles hit that sweet spot between a cool summer treat and a smart snack. They taste like dessert, but they’re packed with protein to keep you fuller for longer. Whether you’re post-workout, managing afternoon cravings, or just want something fun and better-for-you, these pops deliver.
You’ll love how easy they are to customize, and you won’t need any special equipment beyond a blender and some molds. Make a batch once, and you’ll have a stash ready whenever the mood hits.
Ingredients
Method
- Set up your workspace: Place molds and sticks on the counter. This keeps you from scrambling once the mixture is blended.
- Add wet ingredients to the blender first: Pour in milk and yogurt.This helps the blades pull everything down smoothly.
- Add protein powder and flavors: Sprinkle in your scoop of protein powder, plus vanilla, cocoa, lemon, or a pinch of salt as desired.
- Add fruit and sweetener: Toss in frozen fruit and your chosen sweetener. Start on the low end; you can adjust after tasting.
- Blend until very smooth: Aim for a thick, pourable texture. If it’s too thick or sandy, add a splash more milk and blend again.
- Taste and adjust: Sweetness dulls when frozen. Make it slightly sweeter than you want at room temp. Adjust flavor boosters or sweetener now.
- Optional mix-ins: Stir in chocolate chips, coconut, or small fruit pieces by hand to avoid pulverizing them.
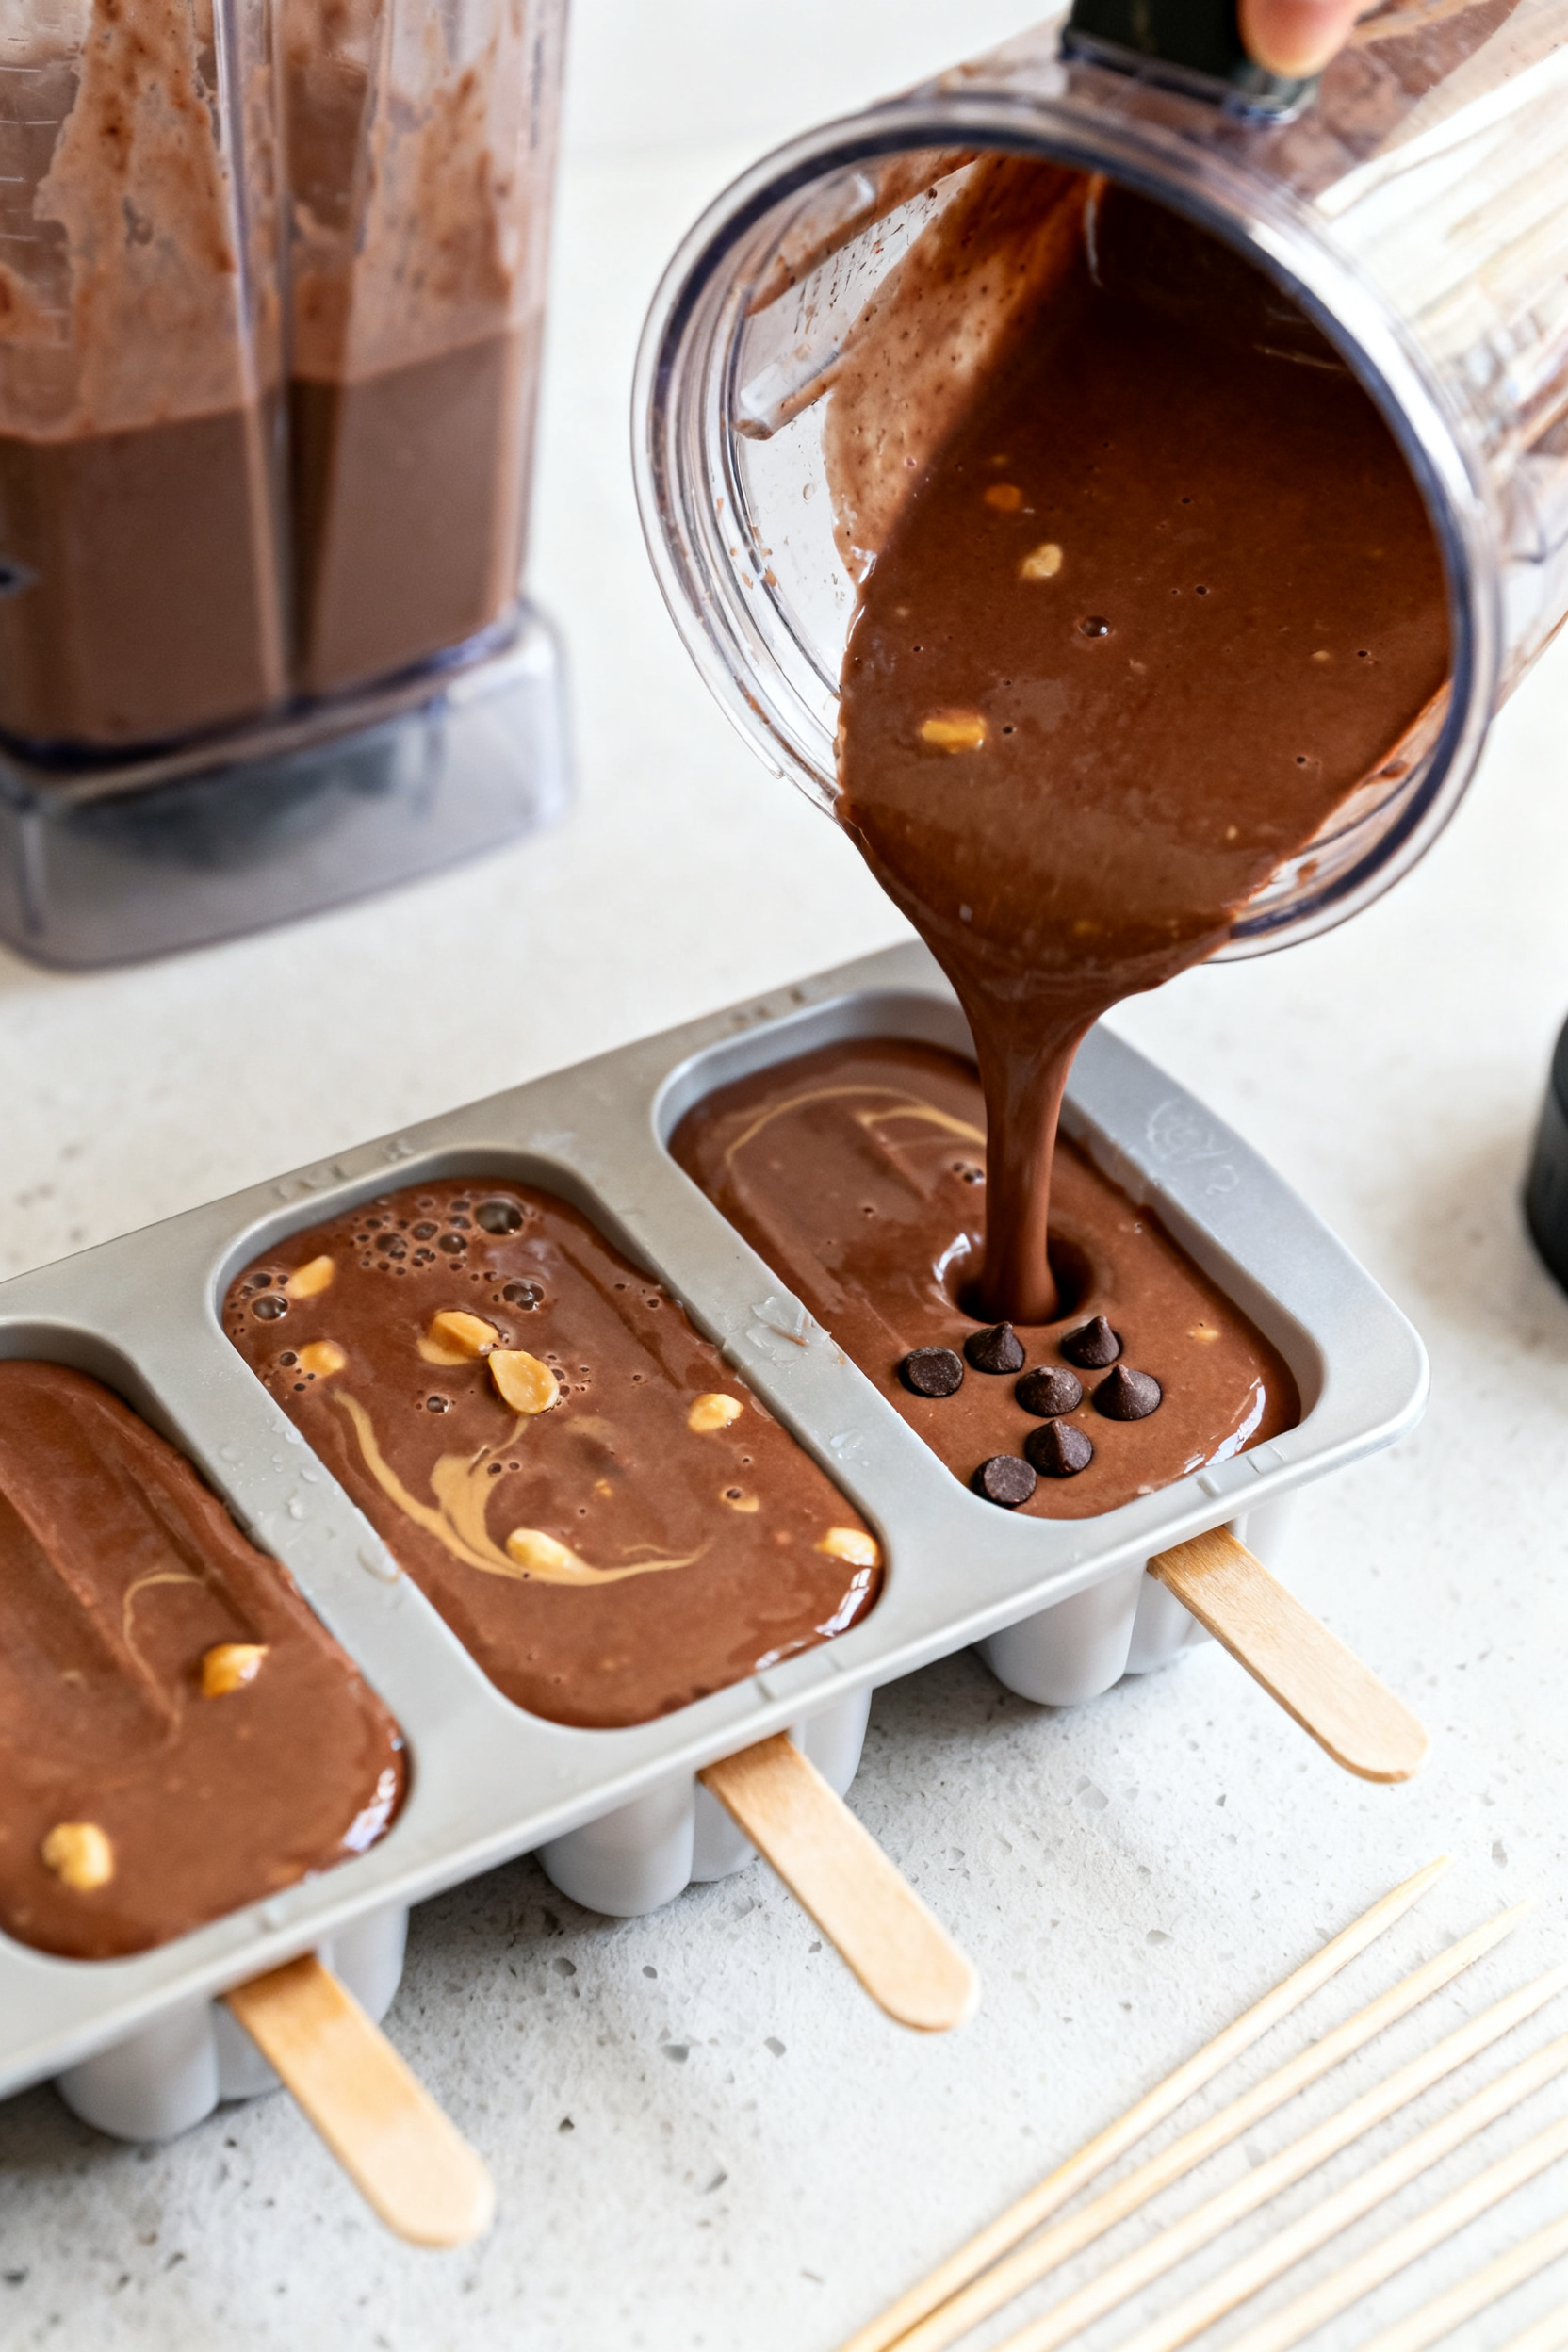
- Pour into molds: Leave a tiny bit of headspace for expansion.Tap molds gently on the counter to release air bubbles.
- Insert sticks: If your mold doesn’t hold them upright, freeze for 45–60 minutes, then insert sticks once the mixture is slushy.
- Freeze until solid: Freeze for 4–6 hours, or overnight for best results.
- Unmold: Run warm water over the outside of the molds for 10–20 seconds, then wiggle the sticks gently to release.
- Enjoy or store: Eat immediately or wrap each pop and return to the freezer for later.
Why This Recipe Works
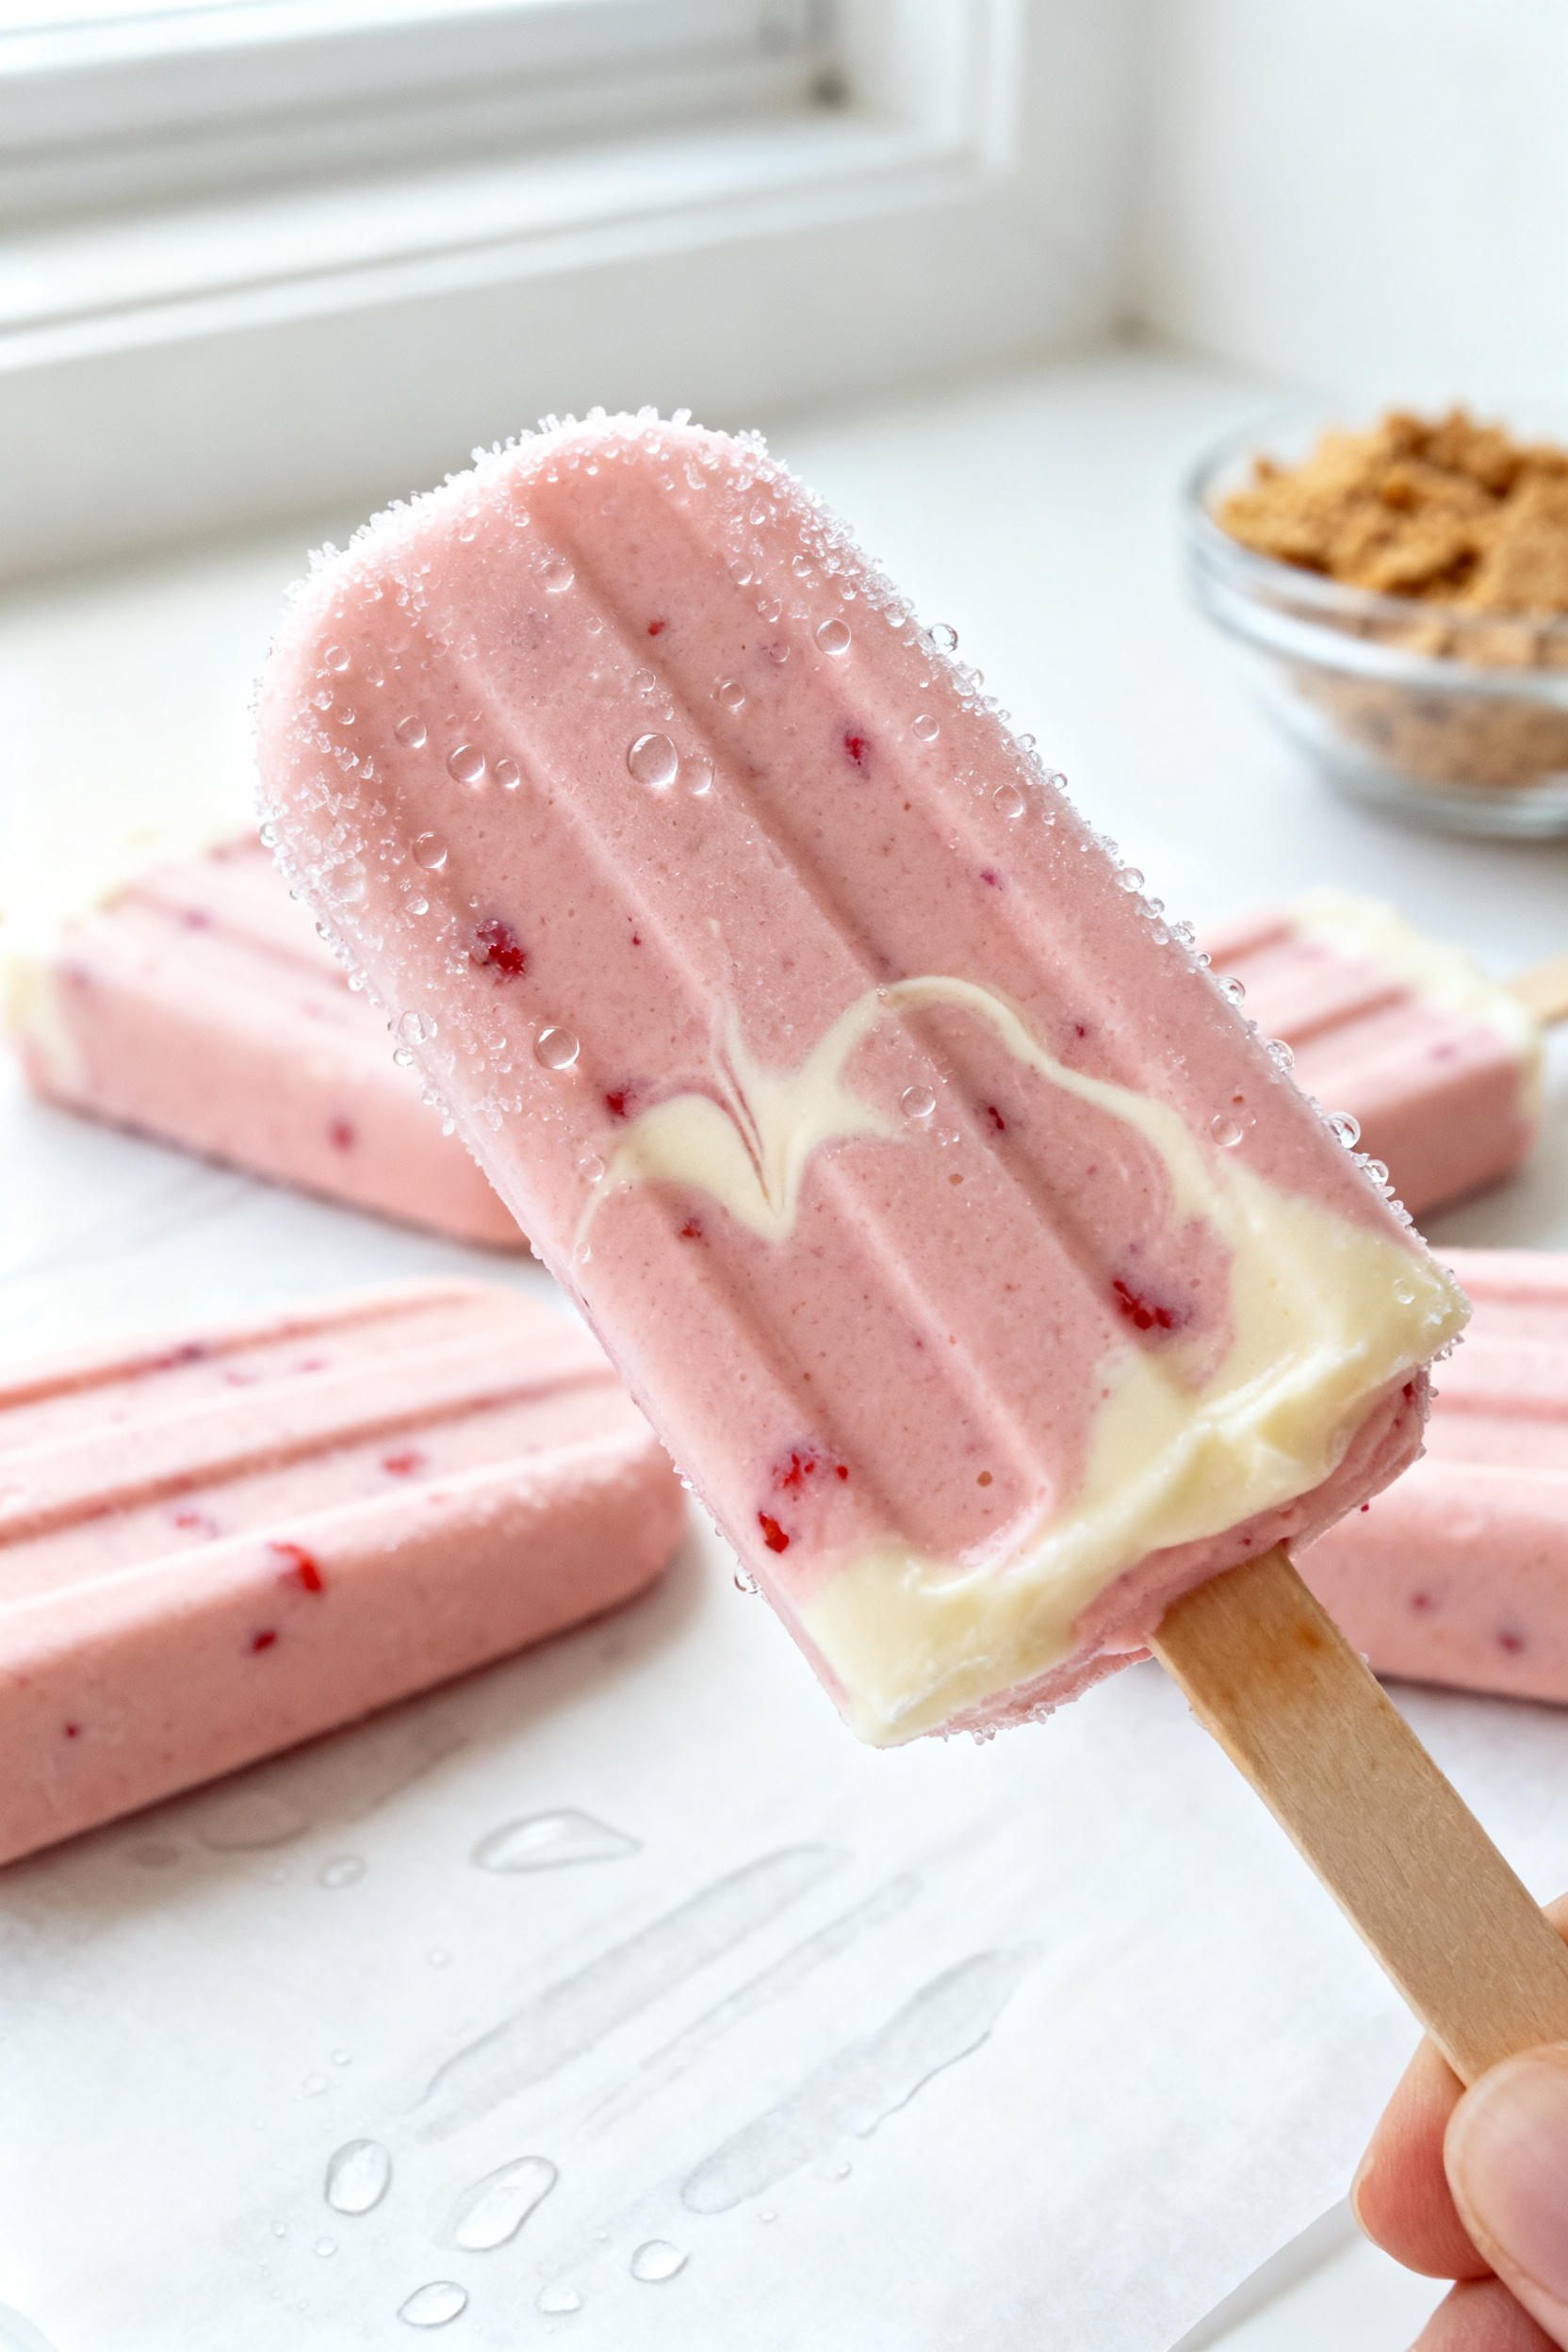
- Balanced texture: Greek yogurt and a bit of milk make the base creamy, not icy, so the pops don’t freeze into rock-hard blocks.
- High-protein foundation: A scoop of protein powder boosts grams without making the pops chalky, thanks to enough liquid and a touch of fat from yogurt or nut butter.
- Customizable sweetness: You control the sweetener. Fresh fruit, a drizzle of honey, or zero-calorie options all work.
- Quick prep, slow reward: The mixture blends in minutes and sets in the freezer while you get on with your day.
- Kid- and adult-friendly flavors: From chocolate-peanut butter to strawberry cheesecake, these pops feel fun, not “healthy.”
What You’ll Need (Ingredients)
- Greek yogurt (plain or vanilla), 1 cup: For creaminess and extra protein.
- Protein powder, 1 scoop (25–35 g): Whey blends smoothly; plant protein works with a bit more liquid.
- Milk, 1/2–3/4 cup: Dairy or non-dairy (almond, oat, soy).
Adjust to reach a pourable consistency.
- Frozen fruit, 1–1.5 cups: Strawberries, mango, blueberries, or mixed berries add sweetness and color.
- Sweetener, to taste: Honey, maple syrup, agave, or stevia/monk fruit. Start with 1–2 tablespoons (or a few drops for non-sugar sweeteners).
- Flavor boosters (optional): 1–2 teaspoons vanilla extract, a squeeze of lemon, a pinch of salt, or 1–2 tablespoons cocoa powder.
- Creaminess enhancers (optional): 1–2 tablespoons nut butter or 1 tablespoon chia seeds for body.
- Mix-ins (optional): Mini chocolate chips, sliced fruit, coconut flakes, or crushed nuts.
- Equipment: Blender, popsicle molds (6–8 cavities), sticks, and freezer space.
Step-by-Step Instructions
- Set up your workspace: Place molds and sticks on the counter. This keeps you from scrambling once the mixture is blended.
- Add wet ingredients to the blender first: Pour in milk and yogurt.
This helps the blades pull everything down smoothly.
- Add protein powder and flavors: Sprinkle in your scoop of protein powder, plus vanilla, cocoa, lemon, or a pinch of salt as desired.
- Add fruit and sweetener: Toss in frozen fruit and your chosen sweetener. Start on the low end; you can adjust after tasting.
- Blend until very smooth: Aim for a thick, pourable texture. If it’s too thick or sandy, add a splash more milk and blend again.
- Taste and adjust: Sweetness dulls when frozen. Make it slightly sweeter than you want at room temp. Adjust flavor boosters or sweetener now.
- Optional mix-ins: Stir in chocolate chips, coconut, or small fruit pieces by hand to avoid pulverizing them.
- Pour into molds: Leave a tiny bit of headspace for expansion.
Tap molds gently on the counter to release air bubbles.
- Insert sticks: If your mold doesn’t hold them upright, freeze for 45–60 minutes, then insert sticks once the mixture is slushy.
- Freeze until solid: Freeze for 4–6 hours, or overnight for best results.
- Unmold: Run warm water over the outside of the molds for 10–20 seconds, then wiggle the sticks gently to release.
- Enjoy or store: Eat immediately or wrap each pop and return to the freezer for later.
How to Store
- Short term: Keep pops in the mold with a cover for up to 1 week.
- Long term: Unmold, wrap each pop tightly in parchment or plastic wrap, then place in a freezer bag. Freeze up to 2 months for best taste and texture.
- Prevent freezer burn: Squeeze extra air out of bags and store pops toward the back of the freezer, not the door.
Why This is Good for You
- Protein supports satiety: A protein-rich snack helps curb hunger and supports muscle recovery after activity.
- Controlled sugar: You decide the sweetness level and type, which can reduce overall added sugar.
- Whole ingredients: Fruit adds fiber and vitamins, while yogurt contributes calcium and probiotics.
- Custom macronutrients: With your choice of protein powder and milk, you can tailor the pops to your diet.
Pitfalls to Watch Out For
- Chalky texture: Often caused by too much protein powder and not enough liquid or fat. Add a splash more milk or a spoon of nut butter.
- Overly icy pops: If you skip yogurt or any fat, the texture can get hard. Use Greek yogurt or a creamy milk alternative.
- Not sweet enough after freezing: Cold mutes sweetness. Sweeten slightly more than you think you need before freezing.
- Sticks leaning or falling: Let the mixture firm up for 45–60 minutes before inserting sticks if your mold doesn’t support them.
- Fruit chunks too big: Large pieces can cause crumbly pops.
Keep mix-ins small, or fold them in finely chopped.
Recipe Variations
- Strawberry Cheesecake: Vanilla whey, Greek yogurt, strawberries, a squeeze of lemon, and a teaspoon of vanilla. Swirl in a spoon of softened light cream cheese.
- Chocolate Peanut Butter: Chocolate protein, milk, cocoa powder, a tablespoon of peanut butter, and a pinch of salt. Add mini chocolate chips for crunch.
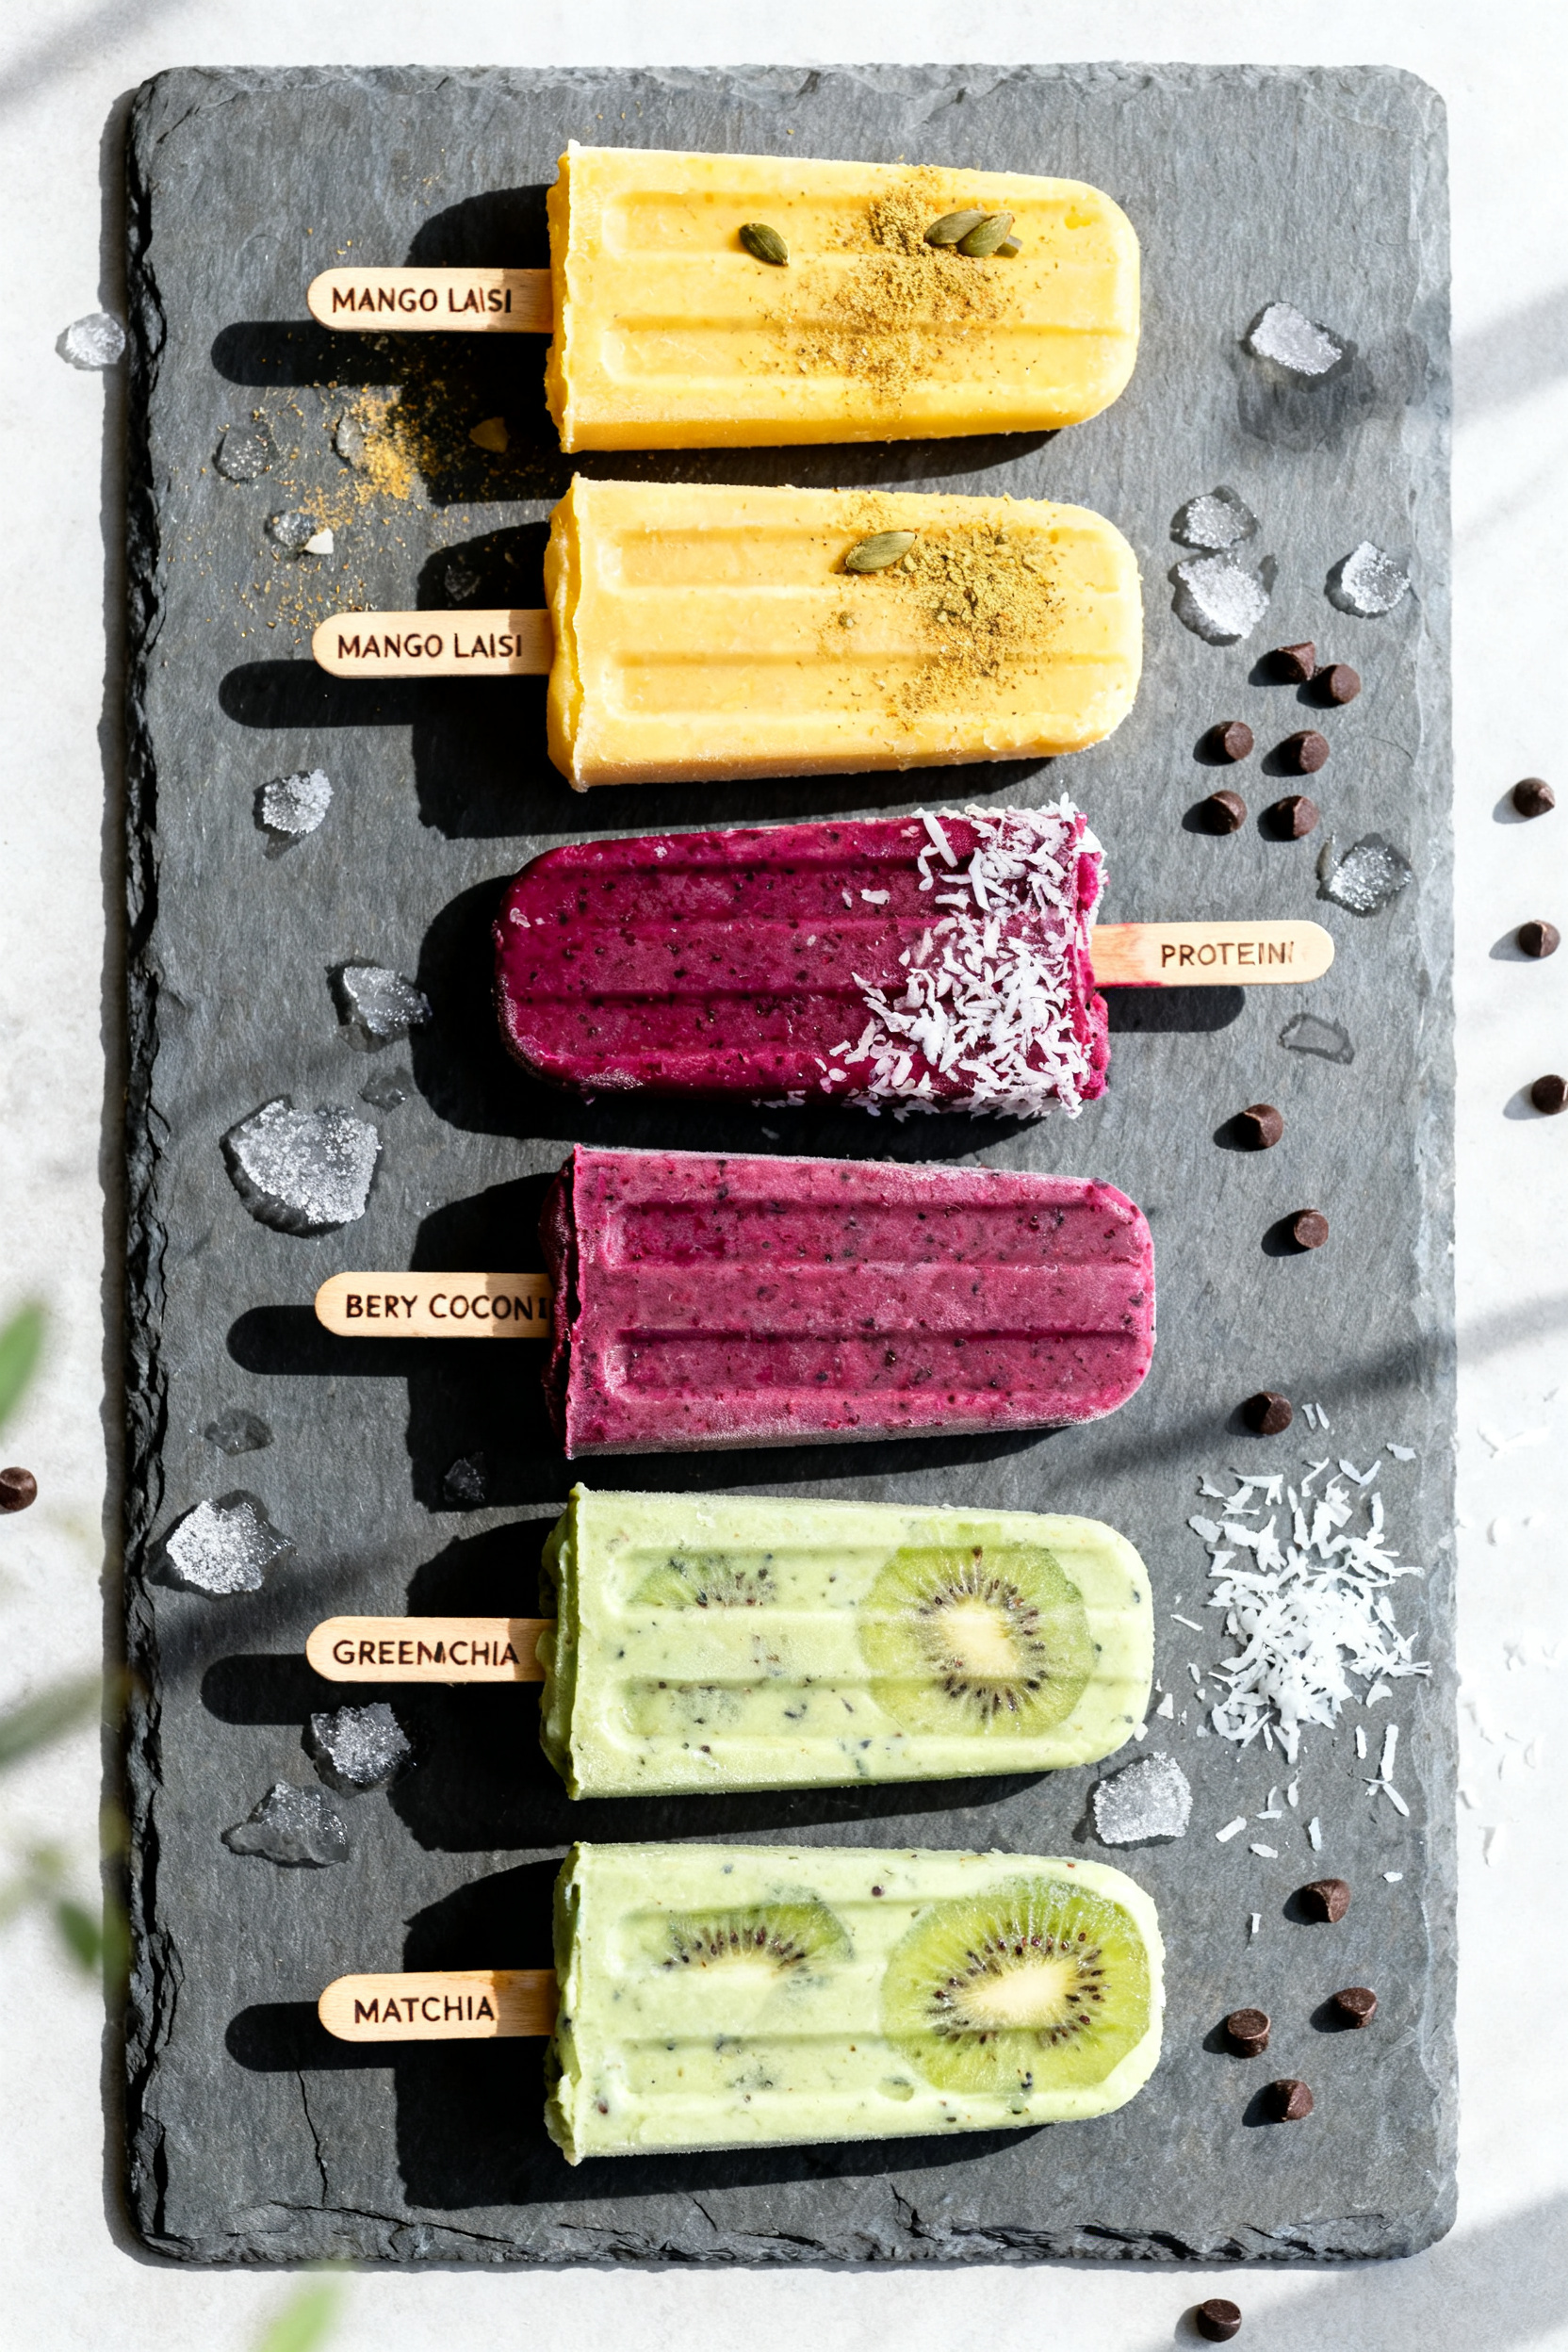
- Mango Lassi: Unflavored or vanilla protein, mango, Greek yogurt, a splash of milk, honey, and a pinch of cardamom.
- Berry Coconut: Mixed berries, coconut milk, vanilla protein, and a little shredded coconut.
- Mocha Fudge: Chocolate protein, milk, cocoa, a teaspoon of instant espresso, and a drizzle of maple syrup.
- Green Matcha: Vanilla protein, Greek yogurt, milk, 1 teaspoon matcha powder, and honey.
Add kiwi slices to the molds for a pretty look.
- Dairy-Free Dream: Use coconut yogurt and soy or almond milk with plant-based protein. Add a touch more liquid to smooth plant powders.
FAQ
How much protein is in each popsicle?
It depends on your protein powder and portion size, but most batches yield 6–8 pops with about 8–12 grams of protein each. Check your specific protein label and divide by the number of molds.
Can I make these without a blender?
Yes, if you use very soft fruit or fruit purée.
Mash the fruit thoroughly with a fork, whisk in yogurt, milk, and protein powder, and strain if lumpy. The texture will be a bit rustic but still tasty.
What if I only have plant-based protein powder?
It works fine. Plant powders can be grainier, so add an extra 2–4 tablespoons of liquid and blend longer.
A spoon of nut butter or coconut cream also helps smooth things out.
Can I skip the sweetener?
Yes. Rely on ripe fruit for natural sweetness. If the pops taste flat after freezing, add a small splash of fruit juice or a date blended into the mixture next time.
Do I need special popsicle molds?
No.
Small paper cups work well in a pinch. Fill, freeze until slushy, insert sticks, then freeze solid. Peel the cups off before serving.
Why did my pops break when unmolding?
They might not be fully frozen or the mix-ins were too chunky.
Run warm water around the mold longer and keep mix-ins small. A slightly higher yogurt ratio also improves structure.
Can I add vegetables?
Yes, in small amounts. Spinach blends in easily with berries or mango.
Start with a small handful so the flavor stays mild.
Are these okay for kids?
Generally yes. Use a kid-friendly protein powder or skip the powder and lean on Greek yogurt and fruit. Adjust sweetness to taste and avoid caffeine or strong flavors.
Final Thoughts
Protein Popsicles are a simple way to turn a craving into something that actually serves you.
With a creamy base, customizable flavors, and a solid protein boost, they fit into busy days and warm afternoons alike. Keep a batch in your freezer and you’ll always have a better snack option within reach. Once you dial in your favorite combo, this recipe becomes a summer staple you’ll make on repeat.
Printable Recipe Card
Want just the essential recipe details without scrolling through the article? Get our printable recipe card with just the ingredients and instructions.