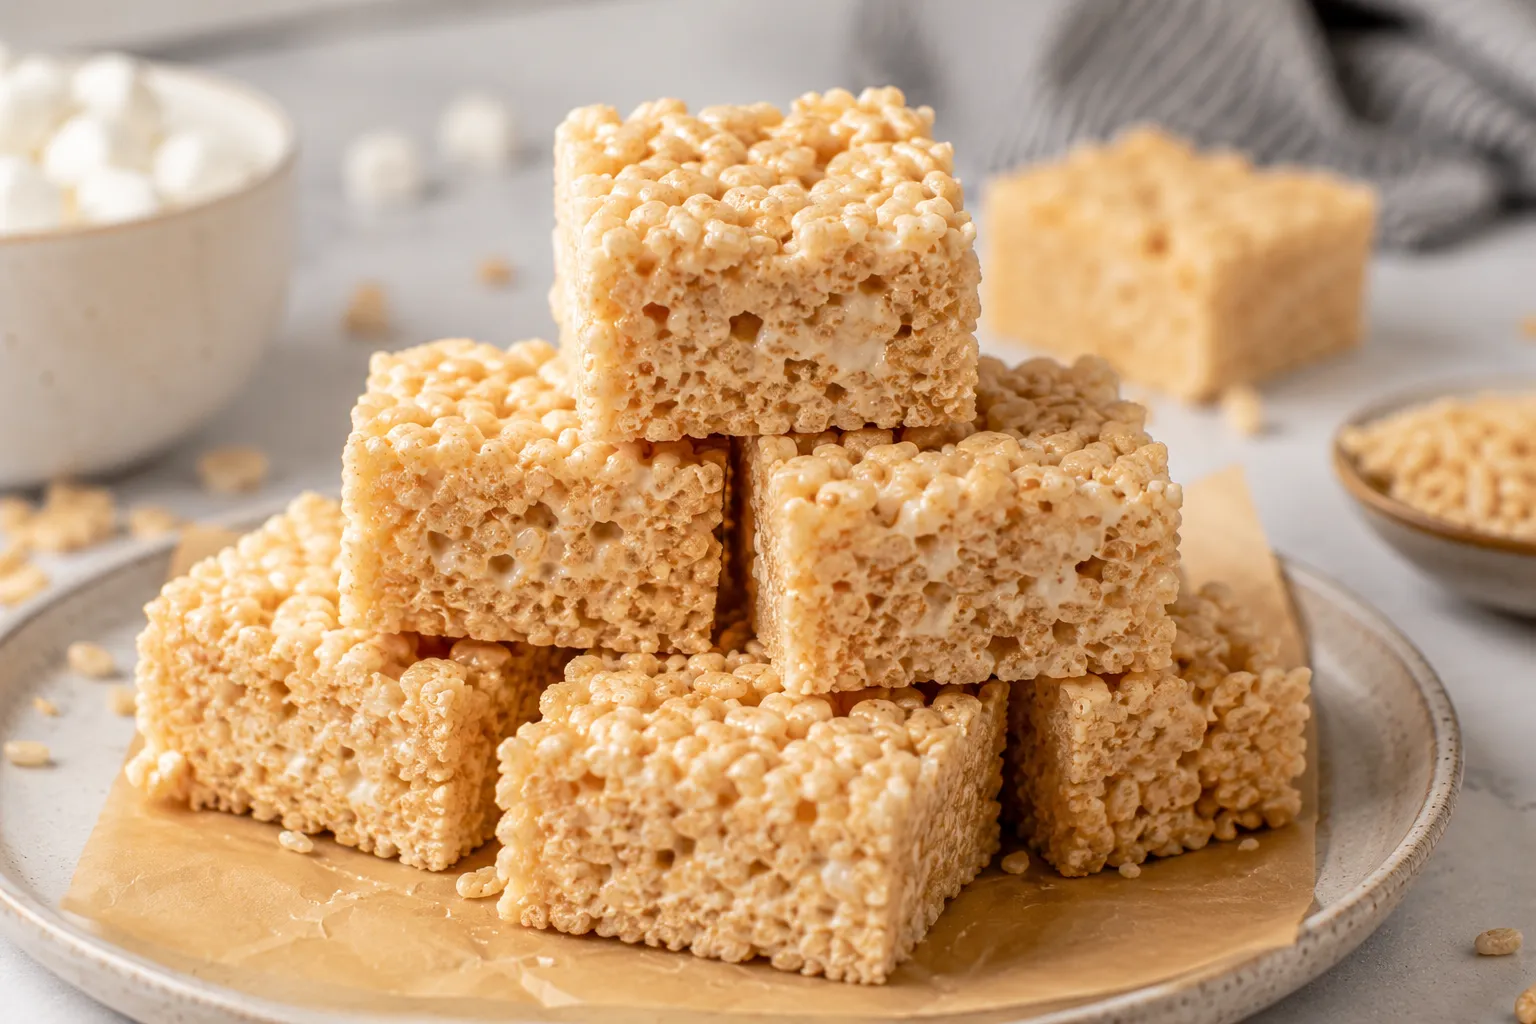
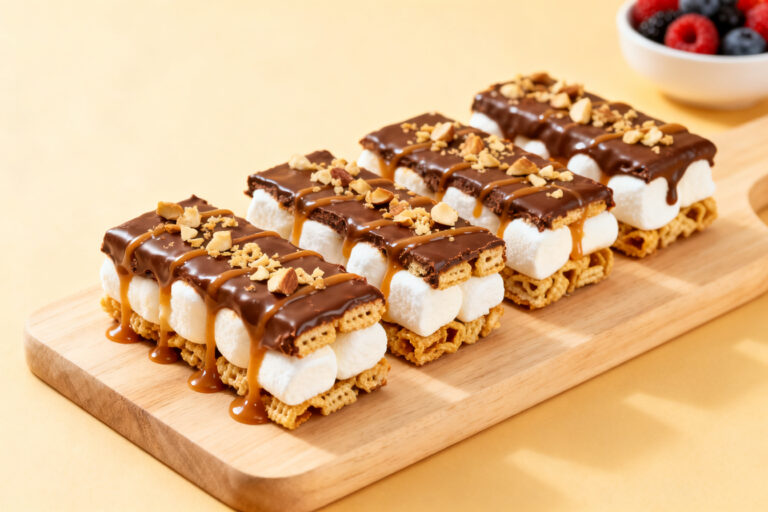
No-bake Rice Krispie treats are the kind of dessert that makes everyone light up. They’re quick, nostalgic, and wildly satisfying, with that perfect chewy-crisp bite. You don’t need an oven, and you don’t need fancy equipment—just a pot, a spoon, and a pan.Whether you’re making them for a bake sale, a lunchbox, or a last-minute get-together, they always land. And if you’ve only had the store-bought kind, these homemade bars will convert you for good.
No-Bake Rice Krispie Treats - Simple, Chewy, and Crowd-Pleasing
10ouncesmini marshmallows (about 5–6 cups; fresh works best)
4tablespoonsunsalted butter
1teaspoonpure vanilla extract
1/4teaspoonfine sea salt
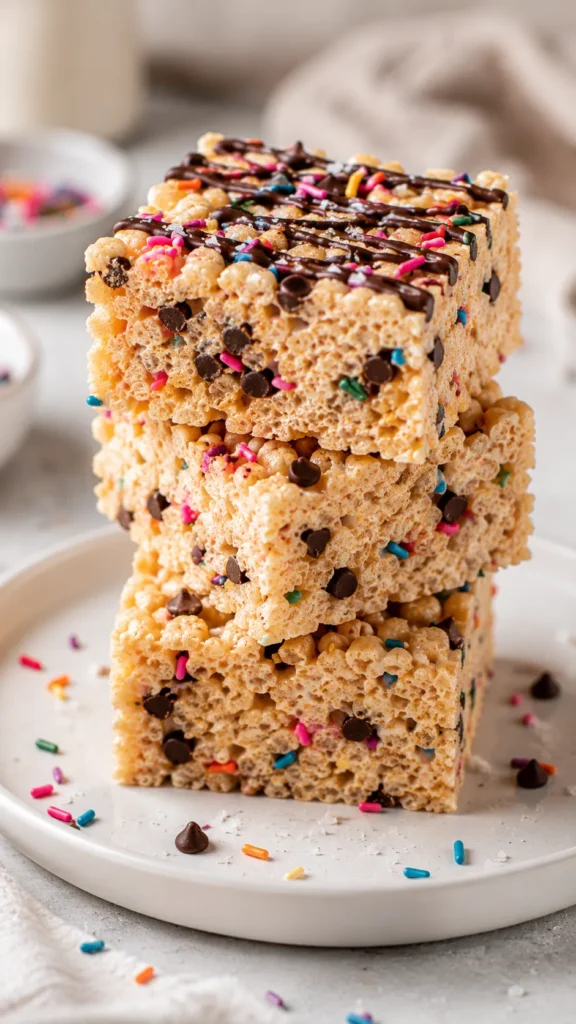
Optional mix-ins: 1/2 cup mini chocolate chips, sprinkles, crushed freeze-dried fruit, chopped peanuts, or M&M’s
Optional topping: melted chocolate for drizzling
Nonstick spray or extra butter (for the pan and spatula)
Method
Prep the pan: Lightly grease a 9x13-inch baking pan with butter or nonstick spray. For easier removal, line it with parchment and grease the parchment, too.
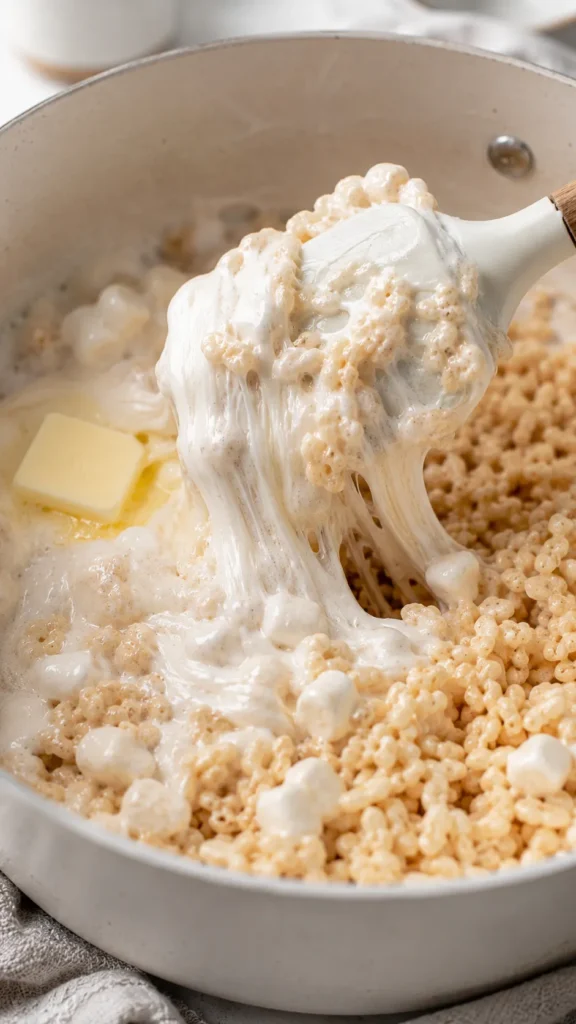
Melt the butter: In a large pot over low heat, melt the butter gently.Keep the heat low to avoid browning unless you want a toasty flavor.
Add marshmallows: Stir in the mini marshmallows. Keep the heat on low and stir constantly until smooth and fully melted. Take your time here—low and slow prevents scorching and keeps the texture soft.
Flavor it: Remove the pot from the heat.Stir in the vanilla and salt until evenly distributed. This small step makes a big difference in taste.
Add the cereal: Pour in the crispy rice cereal and fold gently with a buttered spatula until every piece is coated. Don’t overmix; stop as soon as it looks even.
Fold in extras (optional): If using chocolate chips or candies, let the mixture cool for 1–2 minutes so they don’t melt completely.Then gently fold them in.
Press into the pan: Transfer the mixture to the prepared pan. Lightly grease your spatula—or your clean hands—and press the mixture into an even layer. Do not pack it down too firmly, or the bars can turn dense and hard.
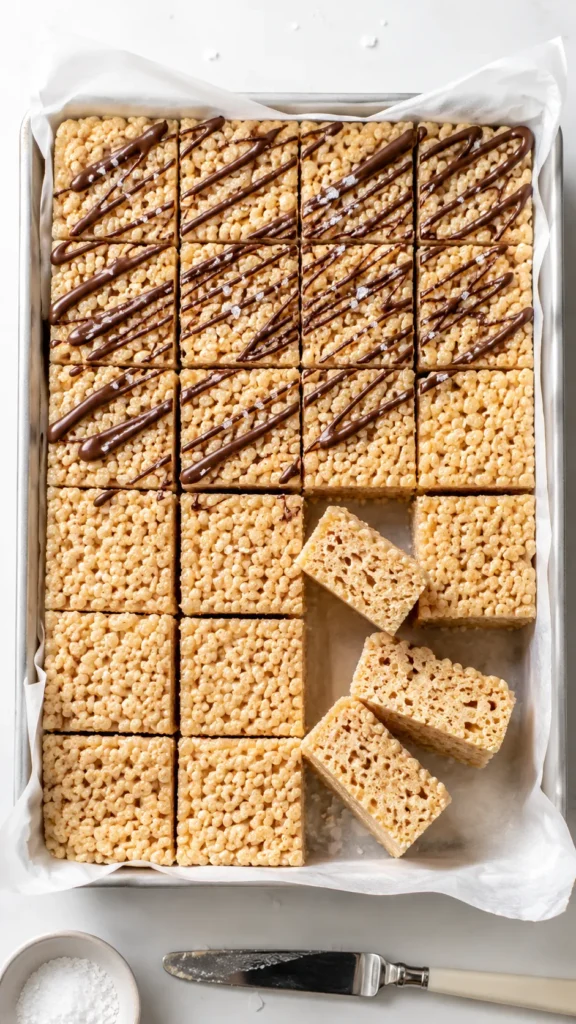
Set and slice: Let the pan sit at room temperature for 30–45 minutes until set. Slice into squares with a sharp knife.For neat edges, wipe the knife between cuts.
Optional finish: Drizzle with melted chocolate and add a pinch of flaky salt for a sweet-salty finish.
Homemade Rice Krispie treats come down to a few smart choices. The big one is marshmallows: using fresh, mini marshmallows melts more evenly and gives you a soft, gooey texture.A touch of salt and vanilla rounds out the sweetness so the flavor tastes balanced, not one-note. Butter keeps everything silky, and just the right ratio of cereal to marshmallow ensures each square holds together without turning rock-hard.
What You’ll Need (Ingredients)
6 cups crispy rice cereal (like Rice Krispies)
10 ounces mini marshmallows (about 5–6 cups; fresh works best)
4 tablespoons unsalted butter
1 teaspoon pure vanilla extract
1/4 teaspoon fine sea salt
Optional mix-ins: 1/2 cup mini chocolate chips, sprinkles, crushed freeze-dried fruit, chopped peanuts, or M&M’s
Optional topping: melted chocolate for drizzling
Nonstick spray or extra butter (for the pan and spatula)
How to Make It
Prep the pan: Lightly grease a 9×13-inch baking pan with butter or nonstick spray. For easier removal, line it with parchment and grease the parchment, too.
Melt the butter: In a large pot over low heat, melt the butter gently.Keep the heat low to avoid browning unless you want a toasty flavor.
Add marshmallows: Stir in the mini marshmallows. Keep the heat on low and stir constantly until smooth and fully melted. Take your time here—low and slow prevents scorching and keeps the texture soft.
Flavor it: Remove the pot from the heat.Stir in the vanilla and salt until evenly distributed. This small step makes a big difference in taste.
Add the cereal: Pour in the crispy rice cereal and fold gently with a buttered spatula until every piece is coated. Don’t overmix; stop as soon as it looks even.
Fold in extras (optional): If using chocolate chips or candies, let the mixture cool for 1–2 minutes so they don’t melt completely.Then gently fold them in.
Press into the pan: Transfer the mixture to the prepared pan. Lightly grease your spatula—or your clean hands—and press the mixture into an even layer. Do not pack it down too firmly, or the bars can turn dense and hard.
Set and slice: Let the pan sit at room temperature for 30–45 minutes until set. Slice into squares with a sharp knife.For neat edges, wipe the knife between cuts.
Optional finish: Drizzle with melted chocolate and add a pinch of flaky salt for a sweet-salty finish.
Keeping It Fresh
These treats are best the day they’re made, but they’ll stay tasty for a couple of days if stored right. Keep them in an airtight container at room temperature, not in the fridge. Refrigeration tends to dry them out and makes them stiff.If your kitchen is very warm, separate layers with parchment and store in a cool, dry spot. For longer storage, you can freeze them. Wrap individual squares tightly in plastic, then place them in a freezer bag for up to 6 weeks.Thaw at room temperature for 30–60 minutes before eating. They won’t be quite as soft as fresh, but they’ll still hit the spot.
Benefits of This Recipe
Truly no-bake: No oven, no hassle—great for hot days or tiny kitchens.
Fast: From pot to pan in about 10 minutes, plus a short settle time.
Kid-friendly: Easy steps, minimal mess, and plenty of room for sprinkles and fun add-ins.
Budget-conscious: Simple pantry ingredients stretch far and feed a crowd.
Flexible: Dress them up with chocolate, peanut butter, or fruit, or keep them classic.
Reliable texture: The ratios and low-heat method make chewy, not tooth-breaker, bars.
What Not to Do
Don’t crank the heat: High heat scorches marshmallows and makes the mixture gritty and stiff.
Don’t overpack the pan: Pressing too hard compacts the cereal and ruins the chew.
Don’t use stale marshmallows: Old, dry marshmallows resist melting and create lumpy bars.
Don’t skip the salt: A small pinch balances sweetness and brightens flavor.
Don’t dump in hot mix-ins: Wait a minute before adding chocolate or candies or they’ll melt into a streaky mess.
Variations You Can Try
Brown Butter Bliss: Cook the butter over medium heat until it foams and smells nutty, then proceed as usual. Adds a toasty, caramel-like depth.
Peanut Butter Swirl: Stir 1/2 cup creamy peanut butter into the melted marshmallow mixture before adding cereal.Top with chopped peanuts or mini peanut butter cups.
Chocolate Lovers: Replace 1 cup of cereal with 1 cup of cocoa-flavored crisp cereal and fold in mini chocolate chips. Finish with a chocolate drizzle.
Birthday Cake: Add 1/2 teaspoon almond extract along with the vanilla and fold in colorful sprinkles. A festive pick for parties.
Salted Caramel: Drizzle caramel sauce over the pressed mixture and sprinkle with flaky sea salt.Chill slightly to set.
Trail Mix Crunch: Mix in 1/2 cup chopped pretzels, peanuts, and dried cranberries for sweet-salty balance.
Gluten-Free Friendly: Use a certified gluten-free crispy rice cereal and check that your marshmallows and add-ins are gluten-free.
FAQ
Why are my Rice Krispie treats hard?
This usually happens when the marshmallows are overheated or the mixture is pressed too firmly into the pan. Keep the heat low, remove the pot from the burner as soon as the marshmallows melt, and press the mixture gently—just enough to level it out.
Can I use large marshmallows instead of mini?
Yes, but mini marshmallows melt more evenly and quickly. If using large ones, chop them or be patient with low heat and steady stirring so they melt smoothly.
How do I keep them from sticking to my hands and tools?
Lightly grease your spatula and hands with butter or nonstick spray before pressing the mixture into the pan.You can also lay a sheet of parchment on top and press with that.
Can I reduce the marshmallows to make them less sweet?
You can, but the bars may become crumbly and less chewy. For a slightly less sweet version, keep the marshmallow amount but add an extra pinch of salt or finish with a sprinkle of flaky salt on top.
What’s the best way to cut clean squares?
Let the pan cool and set fully at room temperature. Use a sharp, greased knife and wipe the blade between cuts.For really tidy edges, chill the pan for 10 minutes before slicing.
Do I need to refrigerate them?
No. Refrigeration tends to dry them out and makes them hard. Store at room temperature in an airtight container for the best texture.
Can I make them dairy-free?
Yes.Use a dairy-free butter substitute you like and ensure your marshmallows are dairy-free. The process stays the same.
How many servings does this make?
A 9×13-inch pan yields about 20–24 small squares or 12–16 larger ones, depending on how you cut them. For parties, smaller bites go further and are easier to grab.
Wrapping Up
No-bake Rice Krispie treats are simple, fast, and endlessly customizable.With fresh marshmallows, low heat, and a light hand when pressing, you get soft, chewy squares every time. Keep a bag of mini marshmallows and a box of cereal in the pantry, and you’re never more than a few minutes away from a sweet win. Whether classic or dressed up, these bars deliver that familiar comfort with very little effort.
Printable Recipe Card
Want just the essential recipe details without scrolling through the article? Get our printable recipe card with just the ingredients and instructions.